

A Quick Guide to Setting Up WooCommerce
A Quick Guide to Setting Up WooCommerce

With over 3 million active installations, it is safe to say that WooCommerce is the most popular eCommerce platform solution available to website owners to date.
Powering well over 28% of all online shops, WooCommerce gives website owners the ability to build a fully functional online store directly on top of their existing WordPress website – for free.
Whether you already have an existing WooCommerce shop and are searching for the best way to set up and get started, or you are thinking about opening an online shop and are in the market for high quality, exceptional eCommerce plugin solution, keep reading.
In an effort to help you get your online shop up and running, we are going to look at how to install the WooCommerce plugin and configure the basic settings so you can start selling right away.
WooCommerce Installation
The first thing you will need to do to get started with WooCommerce is download, install, and activate the plugin onto your WordPress website. You can do this in two ways:
- Visit the WordPress Repository and download the plugin
- Download it from within your WordPress dashboard (follow the steps below)

WooCommerce Setup Wizard
After successfully installing and activating WooCommerce, you are met with a setup wizard for setting up WooCommerce. You can skip this step, however for this tutorial, I will select Let’s Go!.
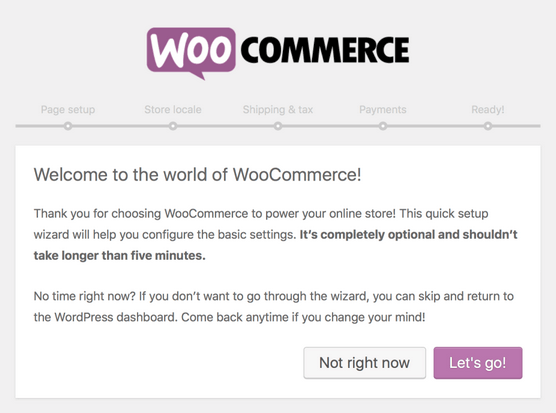
This setup wizard will guide you through the basic setup of the WooCommerce plugin so that you can start selling products right away.
- Page Setup. This section helps set up pages on your website that are needed for selling products. For example, the shop page, cart page, checkout page, and My Account page for registered customers to manage their own accounts.
- Store Locale. Here your online shop’s location, currency, and product units are configured.
- Shipping & Tax. Determine whether you will be charging sales tax or shipping physical products to your customers here.
- Payments. This is for determining which third-party payment gateway (such as PayPal or Stripe) you want to integrate into your shop.
And that’s it! You can now begin configuring detailed settings for your online shop, uploading products, and selling to customers.
Setting Up Your Online Store
Before jumping in and adding your shop’s products, navigate to WooCommerce > Settings first. Here you will find your online shop’s general settings.
General
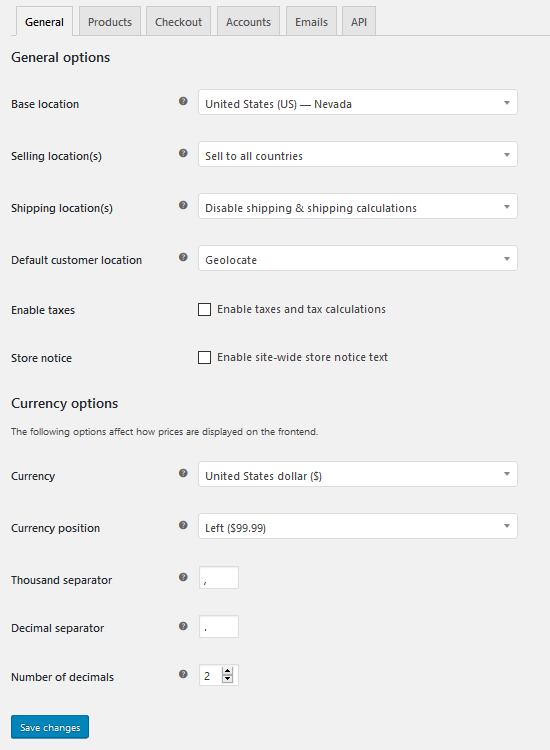
In the General Options section, define the base location for your online shop and identify which countries you would like to sell to, excluding specific countries if you wish.
In addition, enable the geolocation feature for automatic shipping and tax calculations, enable or disable taxes, and even customize a site-wide store message that displays across the top of your site for all customers to see.
On the other hand, the Currency section lets you change all currency-related options such as default currency, currency position, thousand and decimal separators, and the number of decimals.
Products
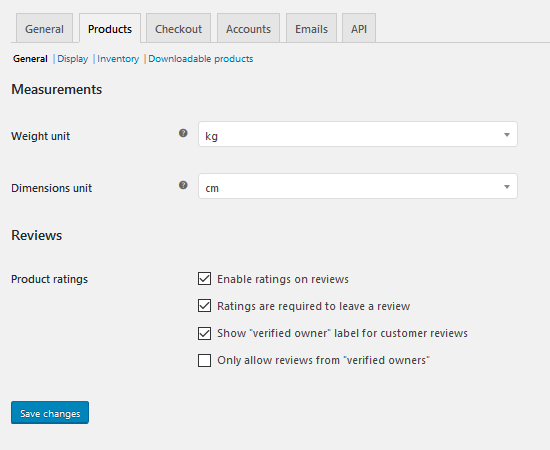
Here you determine the settings as they relate to your products. There are several tabs to configure:
- General. Select the weight and dimension units for your products. In addition, enable product ratings and reviews, and decide whether you want to accept reviews from verified owners only.
- Display. Define your shop page, what you would like to display, the product sorting order, and your cart’s behavior. More so, set your product image’s dimensions.
- Inventory. This section helps your inventory management. If you wish to enable stock management, select the box and configure things such as notifications, thresholds for low and out of stock inventory, and the stock display format.
- Downloadable Products. For those selling digital downloads, this section configures the download methods.
Checkout
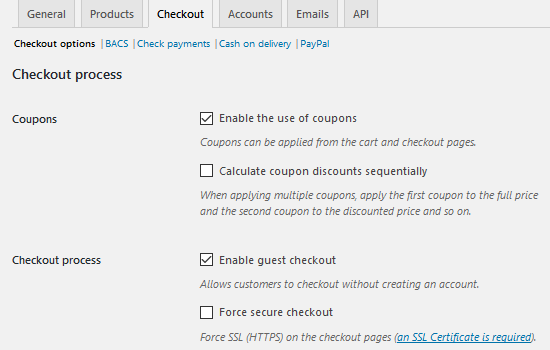
This next section helps you determine the checkout process for your customers. Similar to the Products section, the Checkout section has several tabs.
Checkout Options
If you want to provide coupons to your customers, enable that feature here. This will allow coupons to be used on both the cart and checkout pages of your online shop. In addition, you can also define how multiple coupons will apply to a customer’s purchase.
In addition, if you use an SSL certificate (which is highly recommended for keeping your website’s sensitive information safe), you can force secure checkout.
More so, select from the dropdown which pages on your website will be used for the Cart, Checkout, and Terms and conditions pages. This way WooCommerce directs your customers to the right pages to continue their checkout process.
Lastly, determine the order in which you would like your third-party payment gateways to display to customers on the frontend of your website.
Additional Checkout Tabs
Once you finish configuring your shop’s checkout process settings, you can then change the settings for specific payment options such as BACs, check payments, Cash on delivery, and PayPal. WooCommerce provides these payment gateways to you free of charge.
Accounts
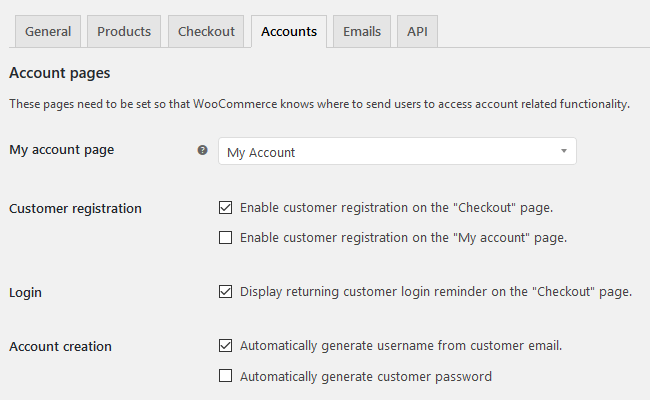
In the Accounts section, select from the dropdown menu the page you want to use for the My Account page. This will be the page customers navigate to when they want to manage their accounts.
In addition, you can configure settings related to customer registration here:
- Enable customer registration on the Checkout or My Account pages
- Decide whether to display a returning customer login reminder on the Checkout page
- Automatically generate a username and/or password for customers
Emails

In the Emails section, configure email options for your online store. For instance, determine settings for emails being sent out to customers.
Here are some of the kinds of emails you may send out to customers:
- New orders
- Cancelled orders
- Processing order
- Completed order
- Customer note
- Reset password
- New account
To start, decide whether to enable the email notification. Then, fill in the information required:
- Recipient
- Subject
- Email heading
- Email type
Additionally, configure things such as the “From” name and email address, the header image, footer text, color, background, and text colors.

This way, any time an email notification goes out related to a specific action performed in your online store (such as a new account being created) your customer receives the template email you have set up here.
Adding Products to Your WooCommerce Shop
After configuring all of the general settings of your WooCommerce shop, you can easily add products to your store and start selling right away.
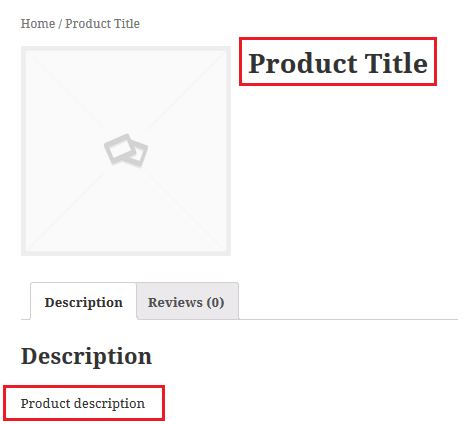
To add a product to your shop, navigate to Products > Add Product. This is what a live preview of your new product page, after adding a product title and description, will look like:
You can also add an image to complement your product at this point under the section labeled Set product image.
Once finished, scroll down and notice the two sections labeled Product data and Product short description.
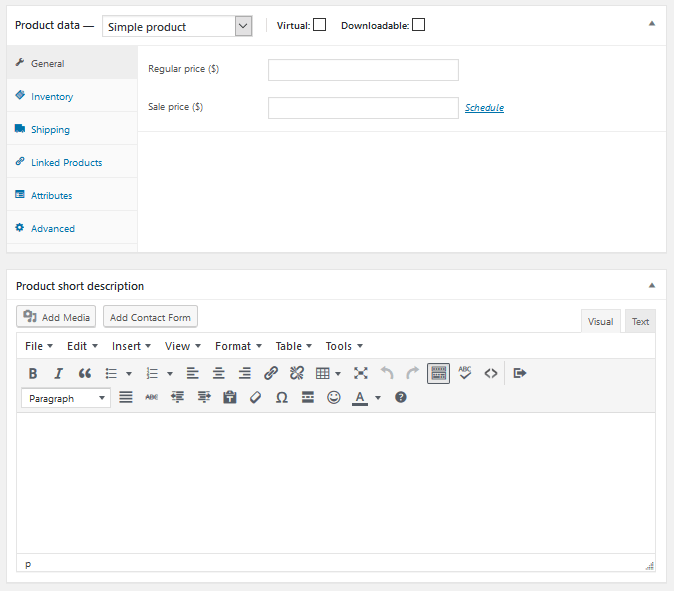
Product data
In this section you can do the following:
- Enable a virtual or downloadable product type
- Set a regular and sale price
- Include inventory data such as SKU information and stock status
- Configure product dimensions and shipping class
- Include cross-sells or upsells
- Add special attributes to the product to encourage purchases
- Enter custom purchase notes
Product short description
In this section, you can create a tagline that appears underneath your product title. This helps generate interest in your products.
In the end, this is what a sample product page might look like to your site visitors:
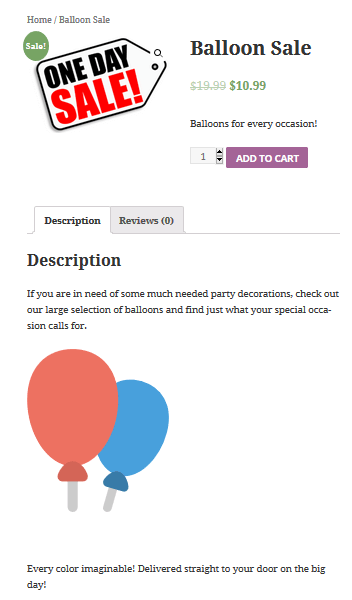
And there you have it. In a matter of minutes, you can have a product uploaded to your online store ready for purchase by interested customers.
Final Thoughts
And there you have it. The quick guide to installing, activating, and setting up WooCommerce.
Altogether, WooCommerce is no doubt one of the most comprehensive, affordable, and efficient eCommerce platforms on the market today. And, as you may have noticed, there is so much depth to this plugin that it truly requires a continuous effort on your part if you seek to maximize all that it has to offer.
However, by following the above-mentioned setup instructions, you will find yourself with a solid start to your online shop endeavor. So, if you are a website owner looking to take that next step into online retail, I suggest you take a look at WooCommerce and see how it can help you.
With a user-friendly interface and extensive documentation to help you should you become overwhelmed or stuck, there is no reason that you can’t get an online shop up and running in no time.
 Shares

Comments are closed.