

How to Set Up a Google Product Feed in WooCommerce
How to Set Up a Google Product Feed in WooCommerce
Creating a Google product feed for Google Shopping from WooCommerce has never been easier. Google Shopping is a section of Google’s search engine platform. It connects the keywords you search for to relevant products available from merchants all across the web. You’ve probably even seen a few products pop up in search results. This can happen without even clicking over to the Shopping tab once or twice.
In this post, we’re going to cover what Google Shopping is and how to set up a Google product feed of your own from your WooCommerce store.
We’ll also go over what to expect once your feed is live.
Let’s get started.
Google Shopping: The Source of Your Google Product Feed
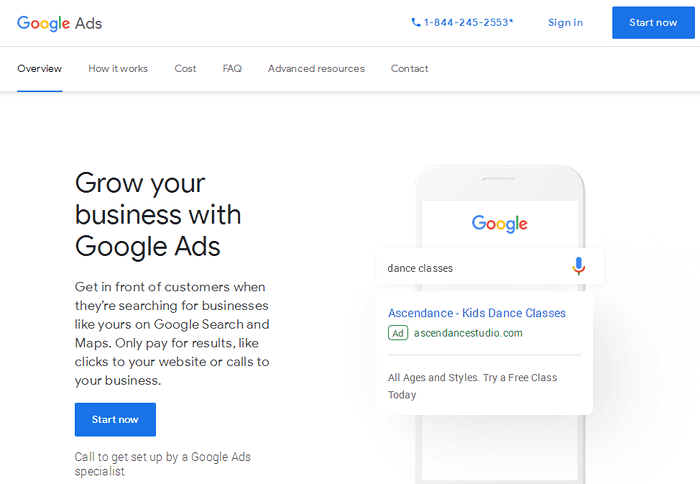
Let’s take a quick peek at Google Shopping and everything it has to offer from the consumer’s perspective. We’ll use the search term “espresso maker” as an example.
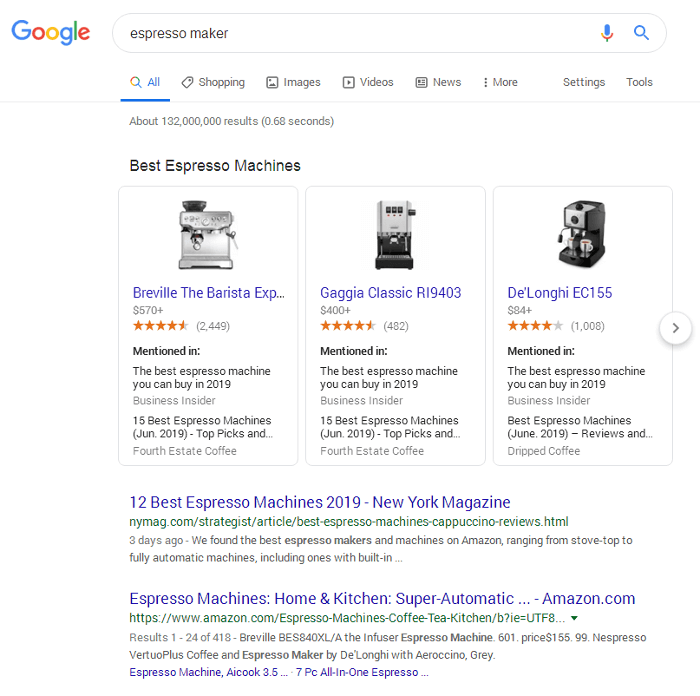
You can see how there are already a few products listed at the top of the search results. This happens even without clicking over to the Shopping tab. These are the best-rated espresso machines Google found in its product database. They are sourced from each store’s Google product feed. You can scroll through them without even having to browse the Shopping tab.
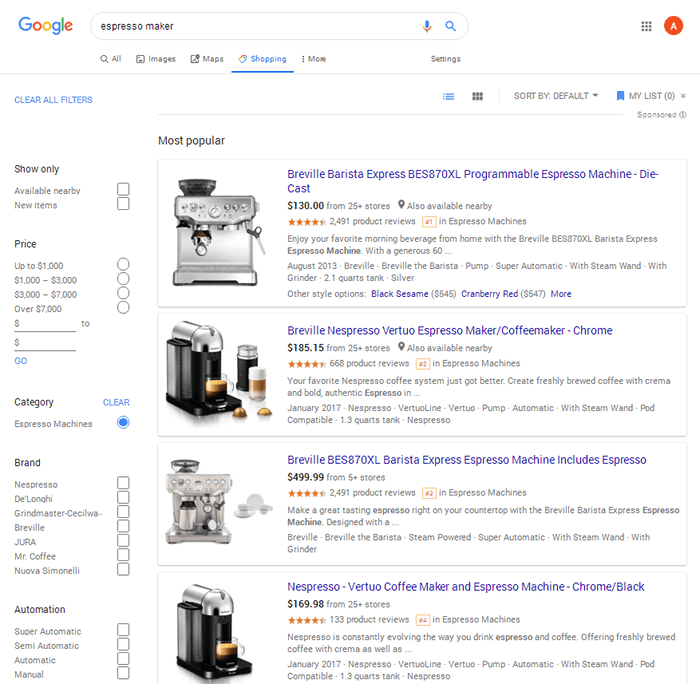
You’ll see a few filters that’ll allow you to narrow your search as well as a sort feature. If you click on an individual product, its info box will expand. It will feature a Visit Store button leading to the store that offers the best price. You can compare prices for additional stores and even read reviews from multiple retailers that sell that product.
How Google Shopping Works for Retailers
In Google Shopping, the collection of products you add is known as a Google product feed. For the longest time beginning in 2012, when Google rebranded its product search tool to “Google Shopping,” to be exact adding a product feed required a Google Ads campaign.
It also required an account with Google Merchant Center.
However, in early 2019, Google announced an update to the way Google Merchant Center accepts product feeds:
“Product data feeds uploaded to Google Merchant Center will now be eligible for display in results on surfaces like Search and Google Images. This product information will be ranked based only on relevance to users’ queries, and no payment is required or accepted for eligibility.”
This means you no longer need to put money in a Google Ads campaign to have your products featured in search results. Adding a product feed to Google Merchant Center is now free.
It also means Google Shopping has moved away from its sponsored nature and now includes organic product listings. You can still get a leg-up on the competition by paying for ads that push your products above organic listings.
The change was applied to stores in the United States at the beginning of 2019. It expanded to other countries later in the year.
Why Use Google Shopping?
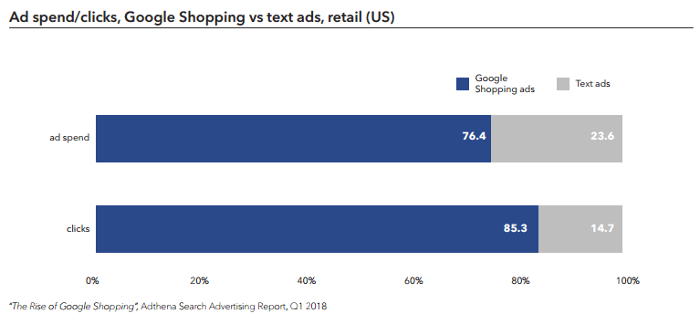
According to a report published by Adthena in 2018 called The Rise of Google Shopping, Google Shopping ads made up 76.4% of ad spend.
They also accounted for 85.3% of clicks in retail search in Q1 of 2018. This data was compared to text ads.
Other key stats from this report include the following:
- Apparel and consumer electronics dominated Google Shopping ads in the US and UK.
- Apparel
- Ad Spend: 84.6% in the US and 89.6% in the UK.
- Clicks: 89.7% in the US and 90.3% in the UK.
- Consumer Electronics
- Ad Spend: 86% in the US and 78.4% in the UK.
- Clicks: 90.2% in the US and 86.1% in the UK.
- Apparel
- Ads are driven by non-branded search terms. Branded search terms only make up 33.6% of ad spend in the US and 20.5% in the UK.
As for the results you can achieve from Google Shopping ads, here are a couple of real-world stats from customers. After spending $112.26 on ads for 19 days, Corey Ferreira earned $319.92 in revenue. He ran an experimental store that sold gaming glasses from Alibaba. That’s a 185% return on investment.
Vertical Rail also increased their client’s revenue by 87% in six months. This was achieved through a renewed focus on their Google Shopping ad strategy.
What You Need to Get Started with Google Shopping
There are a few prerequisites you need to have in order before you get started with Google Shopping. They are:
- Products to sell.
- Return and refund policies.
- SSL-enabled checkout page.
- Verified website in Google Search Console.
- Google Merchant account.
- Google Ads account if you want to advertise.
Here are brief explanations of each.
1. Products to Sell
Since this post is a WooCommerce tutorial at its core, you’ll need a WooCommerce store with products ready to sell. Google Merchant Center requires products to be available for direct product purchase.
This means you aren’t able to list products you’re an affiliate for. Nor can you include products hidden behind pay-per-click links.
2. Return and Refund Policies
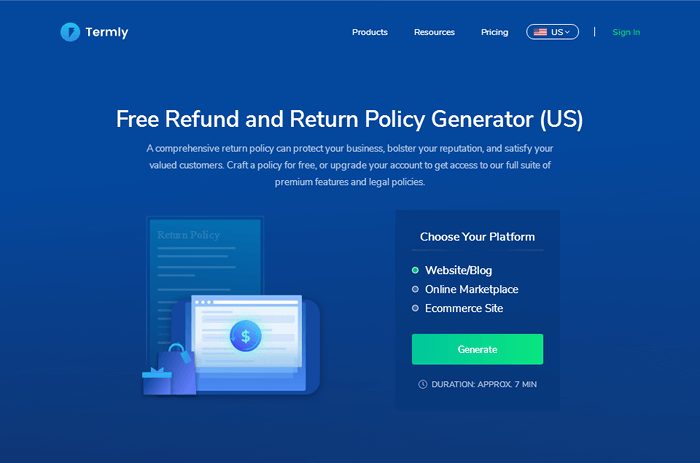
These are required to use Google Shopping. Google wants you to have both of these policies written out and readily available for customers to read. This means placing them in your terms and conditions. Also, insert anchor links in your footer that take the customer directly to that part of your T&Cs.
You can work directly with a lawyer to build your terms and conditions. Or, you can generate your return and refund policies with a couple of simple tools:
3. SSL-Enabled Checkout Page
HTTPS pages are now an official Google ranking factor. So you should already have an SSL certificate applied to your entire site. This means your checkout pages and any page that collects user data should already be encrypted.
Because SSL is a requirement mandated by Google, many hosts now offer free and easy-to-install SSL certificates as complementary services. If your store is behind on this, give our WooCommerce support a try for $1. We’ll take care of it for you.
4. Verify Your Website in Google Search Console
This is another requirement for setting up a Google Merchant Center account. This is because Google uses the verification in Google Search Console to verify your website. This step is done when you add your website to Google Merchant Center.
I highly recommend creating a Google Search Console even if you don’t use Google Shopping. It allows you to submit a sitemap of your site to Google. It also alerts you to critical errors, such as pages set to “noindex” or URLs returning 404 errors.
Head to Google Search Console to get started, and sign in with Google account. Next, click Add a Property to add your website URL as a property.
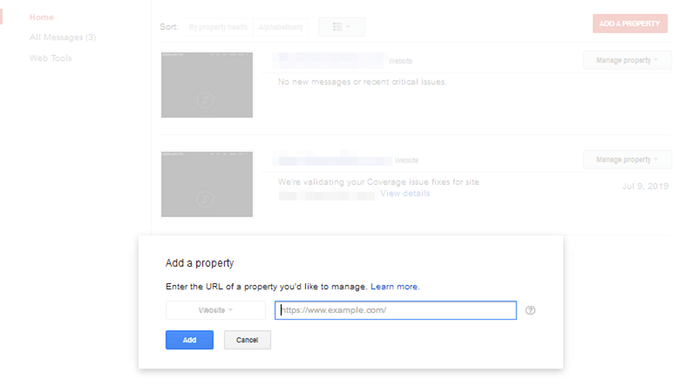
Be sure to add the HTTPS version of your website. If you added “www” to your domain during registration, include it as well.
You’ll then need to verify your website. You can do this in a few simple clicks. This is possible if you have a Google Analytics tracking ID installed on your site. Google will walk you through the other steps, but using your tracking ID is by far the easiest.
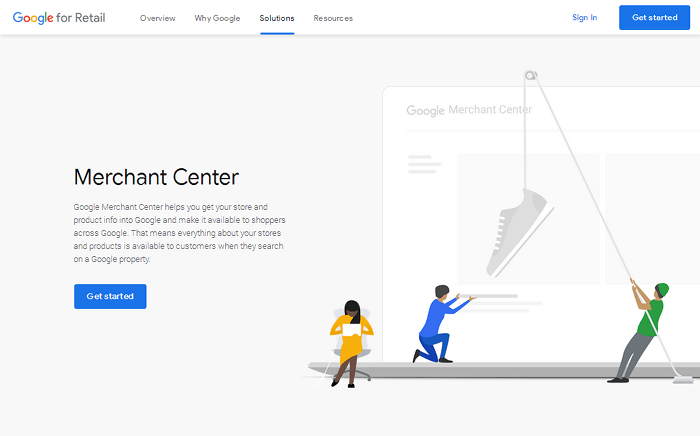
5. Set up a Google Merchant Center Account
Head on over to the Google Merchant Center frontpage, and click Get Started.

You’ll be redirected to a page that explains each section of the registration process. Click Get Started again.
You’ll be asked to sign into your Google account where you can complete the three-part registration form.
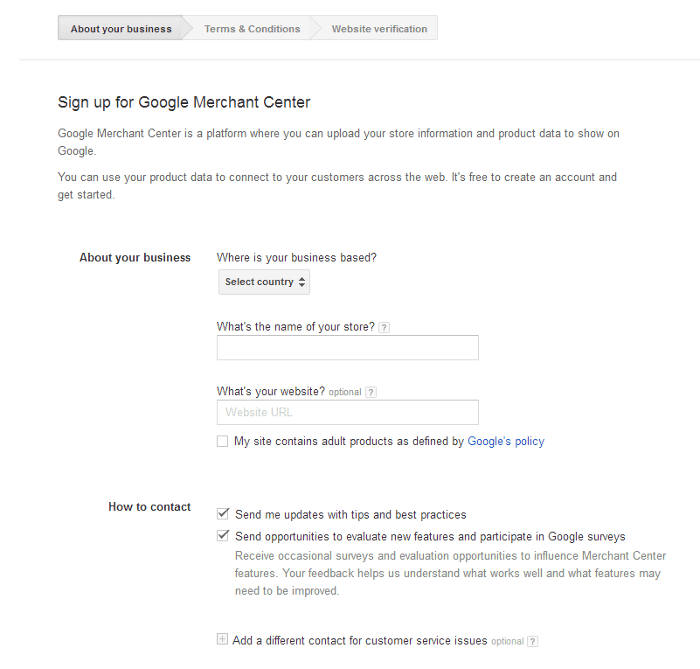
In the first section, enter all relevant information Google needs from you. Agree to their terms and conditions in the second, and verify your website in the third. The website verification step is where Google Search Console comes into play.
You’ll be redirected to the Google Merchant Center dashboard once you click Finish.
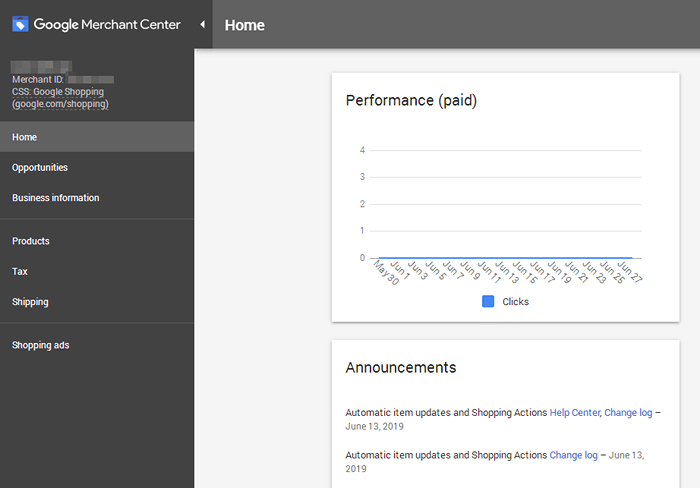
We won’t get into the ins and outs of the Merchant Center dashboard in this post. Just know that you’ll need to go to Products → Feeds to upload the XML file. The plugin we’ll be using generates this for you.
6. Create a Google Ads Account
If you want to promote your products through advertisements, you’ll also need a Google Ads account. Similar to Google Search Console, all you need to do is head to the Google Ads front page. Sign into your Google account from there.
How to Set Up a Google Product Feed in WooCommerce
WordPress plugins expedite thousands of processes in web development. Setting up a Google product feed for your WooCommerce store is no different. There are a handful of plugins that can perform this task for you. But we’re going to focus on one for this tutorial.
WooCommerce Google Feed Manager is a Google product feed plugin that integrates with WooCommerce. It comes in free and premium versions.
Google product feeds feature the same data attributed to your products in WooCommerce. It uses fields for this purpose. What this plugin does is connect those fields to the WordPress database so you can generate feeds without touching a single line of code.
About WooCommerce Google Feed Manager

The free version of WooCommerce Google Feed Manager only connects to Google Shopping. It limits the number of products in your feeds to 100.
You can choose three levels of categories in Google Shopping. Then, connect each feed to one or more categories in WooCommerce.They can be parent or child categories.
There’s also a feature called “Attribute Mapping.” Like I said, this plugin breaks down the fields attributed to each of your WooCommerce products. It matches them to Google Shopping’s fields. This feature allows you to edit those fields. This is helpful in case the plugin’s automated tool got something wrong or if a few fields need to be optimized.
You can also choose how often the plugin updates feeds. This ensures they always showcase newly added products and the latest product information.
Pricing for the premium version of WooCommerce Google Feed Manager starts at €69. It allows you to add an unlimited number of products to your feeds. It also comes with one year of support and updates. Support is available via live chat and a ticket system.
Paying for higher-tiered plans gives you the ability to generate feeds for up to five shops. It also adds more channels like Amazon, Facebook, Bing, and eBay.
We’re going to focus on the free version in this post. But you can just as easily follow along with the premium version.
Installation and Setup
The free version of WooCommerce Google Feed Manager is available in the WordPress plugin repository. That means you can install it just as you would any other plugin.
Log into your WordPress site, and head to the Add New (plugin) page. Search for WooCommerce Google Feed Manager, and install and activate it.
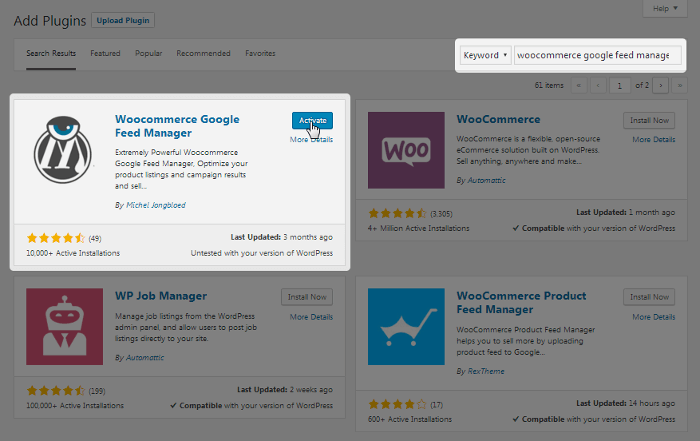
This adds a new menu item to the admin panel called Feed Manager. Hover over it, and head to the Settings page.
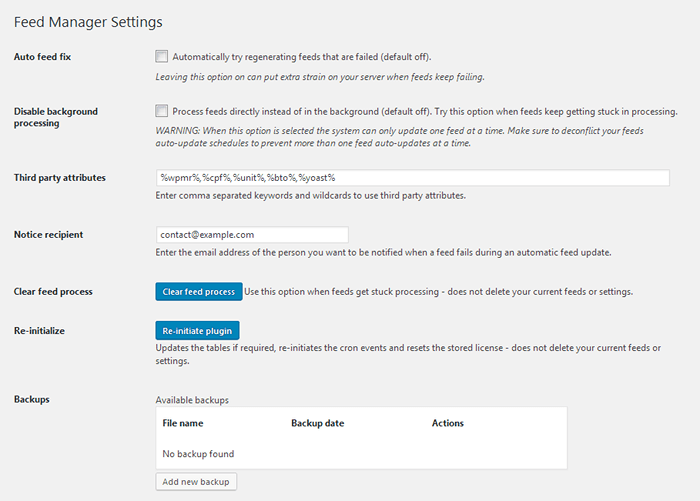
Fortunately, this plugin’s settings are straightforward and likely won’t need to be changed. There are a couple of action settings and buttons to note, however.
This includes the Disable Background Processing, which you can enable if your feeds stall while processing. You can also try clicking the Clear Feed Process button if this happens.
You can also re-initialize the plugin from this page if you need to update your tables. Backups can be created as well.
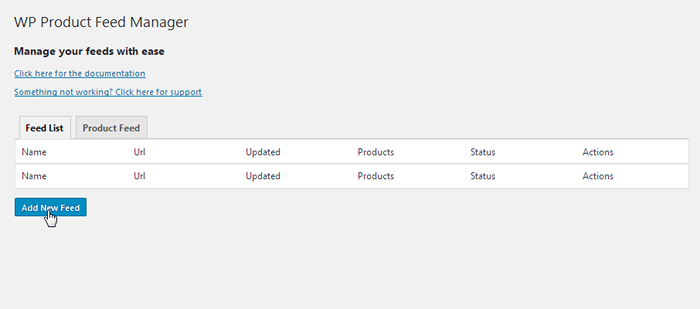
Creating a New Feed
To begin creating a new feed, click over to the Feed Manager section, and click Add New Section.
Enter a descriptive label for your feed in the File Name field. For example: “Men’s T-Shirts – Black.” Then choose Google Merchant as your channel. This reveals more settings you can configure for your feed.
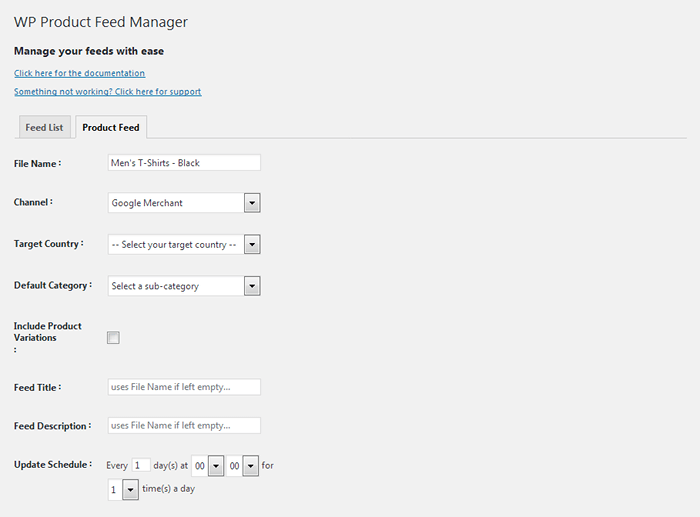
Select the country you’d like to target with this feed/Google ad.
Mapping Categories for Your Feed
The Default Category setting allows you to pick the Google Merchant category that best represents the feed you’re creating. Start by selecting a parent category. For “men’s black t-shirts,” this would be Apparel & Accessories.
Once you select this, another category drop-down menu will appear as will the Category Mapping and Attribute Mapping features.
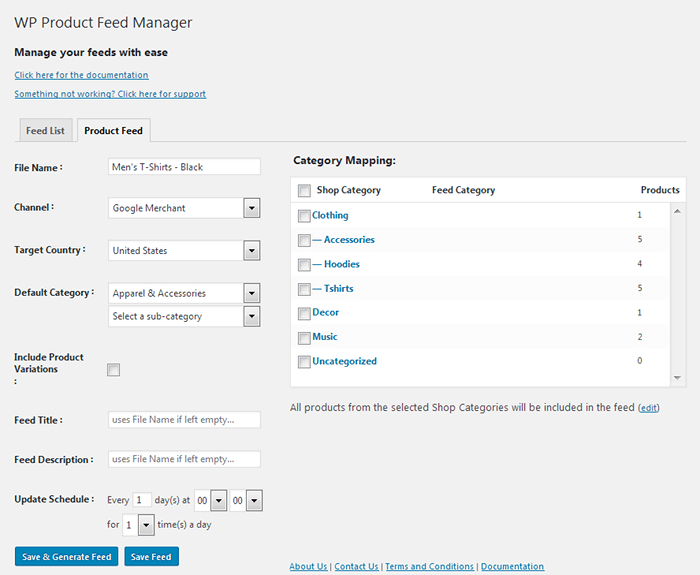
You can choose two more category levels for Google Merchant. This would be “Clothing” and then “Shirts & Tops” for our “men’s black t-shirts” feed. In the Category Mapping box, choose the category(ies) that contains the products you want to include in your feed.
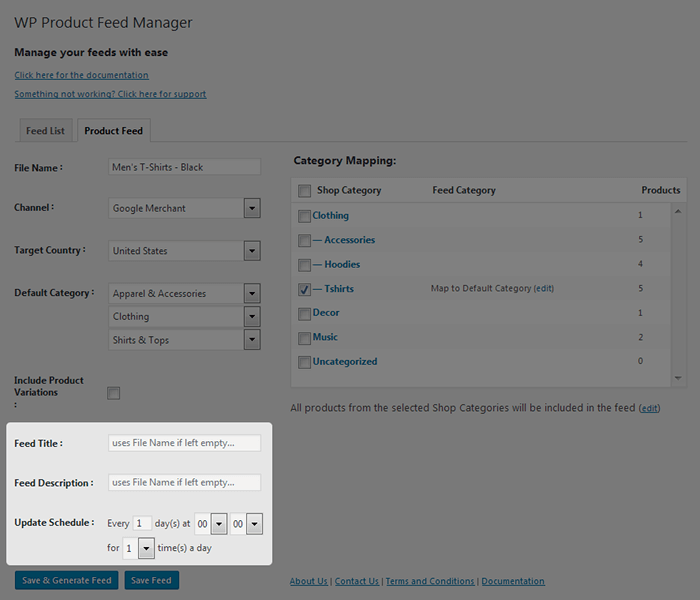
A bit of text that says “Map to Default Category” will appear. This default setting maps the WooCommerce categories you choose to the Google Merchant category you selected. For example, I chose “Shirts & Tops.” Click Edit if you’d like to map an individual WooCommerce category to a different Google Merchant category.
You’ll also see a setting called “Include Product Variations.” When you select this, it’ll add each product variant as individual products in your feed. Unfortunately, this feature is only available in the premium version.
If you didn’t create descriptive enough categories when building your store, take a bit of time to do so. It will help you organize your products better before creating a feed. If you didn’t create descriptive enough categories when building your store, take a bit of time to do so. It will help you organize your products better before creating a feed.
Configuring Additional Feed Settings
There are three more settings you can configure before moving onto Attribute Mapping.
As the placeholder text states, the Feed Title and Feed Description settings will use the File Name if you leave the fields blank.
Update Schedule is a simple setting. You can use it to control how often Google refreshes your feed to reflect newly added products.
Click Save Feed before moving on to the Attribute Mapping section.
Mapping Attributes for Your Feed
This is where you configure how Google Merchant uses the attributes assigned to each of your products. You can generate your feed now using WooCommerce Google Feed Manager’s default settings. But I recommend taking some time to optimize each attribute.
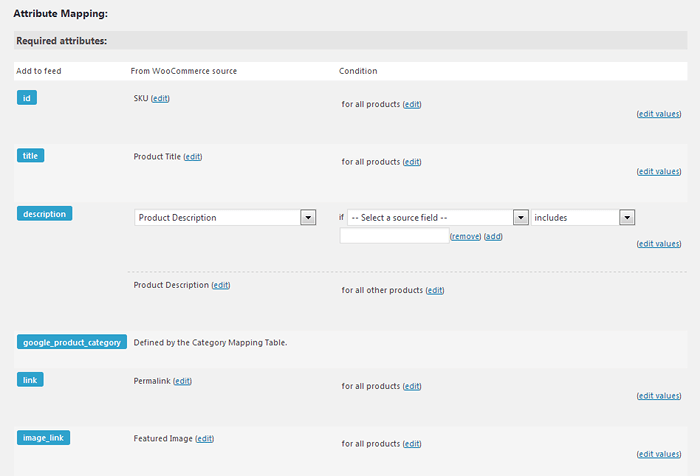
The interface for this section features three columns:
- Add to Feed – The attributes Google Merchant requires.
- From WooCommerce Source – The WooCommerce attribute you wish to use.
- Condition – If this/then do that rules for the map to follow.
Although the plugin lets you assign almost any WooCommerce attribute to a Google Merchant attribute, make sure you choose ones that make sense.
Some attributes don’t need to be configured at all. For example, the Title attribute should be matched with the Product Title WooCommerce attribute. If you want to assign a different attribute, click its Edit button in the From WooCommerce Source column.
For example, you can use WooCommerce’s short description attribute instead of the longer default product description attribute.
Configuring Price, Condition, and Availability
Some attributes have intricate fields you can configure. Examples include Price, Condition, and Availability attributes. These let you configure the product’s price, wear, and inventory status.
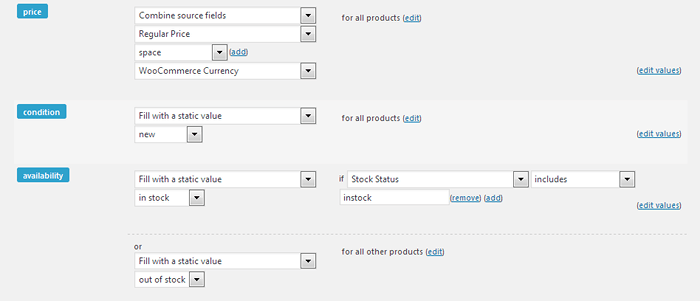
The Price attribute allows you to start by selecting “Combine Source Fields” as a main source field. It’s dynamic, and when used for the Price attribute, it allows you to add multiple source fields. Typically, it starts with the Regular Price WooCommerce attribute.
There are several other WooCommerce attributes that use price, such as “Fixed Shipping Price” and “Sale Price.” Use them if you feel they’re appropriate for your feed.
Using Static Values for Condition and Availability
The Condition and Availability attributes use the dynamic “Fill with a Static Value” source field. For Condition, this setting allows you to choose between “New,” “Used” and “Refurbished” labels. For Availability, this setting allows you to choose between “In Stock,” “Out of Stock” and “Preorder” labels.
You can see how intricate the Availability attribute is in the screenshot above. The rules say: “If stock status includes ‘instock,’ then fill the attribute with the ‘in stock’ static value. Otherwise, fill it with the ‘out of stock’ static value.”
For attributes that say “Select a Source Field,” start with the “Fill with a Static Value” option. It might give you a few choices you can use. The Age Group attribute, for example, adds a drop-down menu with various age groups you can select.
Mapping Optional Attributes
You can add additional attributes the plugin didn’t map for you in the Optional Attributes section.
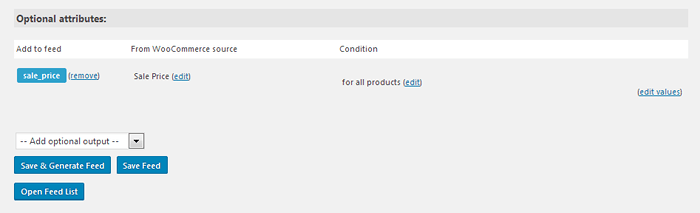
For example, if you plan to apply sale prices to certain products, you can add the Sale Price attribute. You can take this further by applying a rule: “if sale price is empty,” then use the Regular Price attribute.
Be sure to click the Save Feed button if you’re not ready to generate your feed, yet.
Generating Your Feed
Once your categories and attributes are mapped, you can click the Save & Generate Feed button to generate your feed.
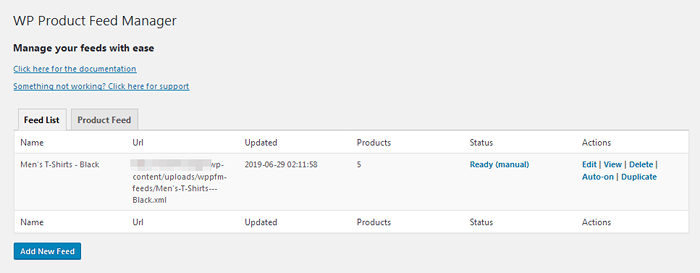
You’ll be able to view it in your Feed List. The plugin also generates a path URL for the XML file. In addition, a few action buttons will be visible. Keep the XML file handy.
Uploading Your Feed to Google Merchant Center
Sign into Merchant Center, and navigate to Products → Feeds, then click the Plus (+) button under Primary Feeds.
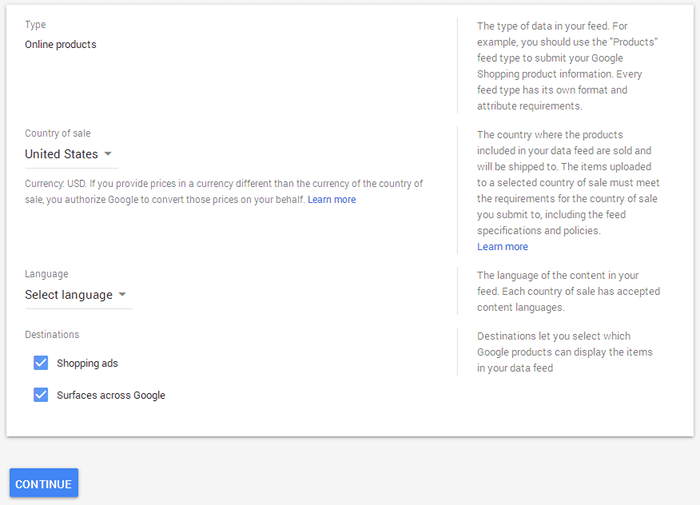
Fill in your feed’s basic information, then select where you’d like it to appear. Selecting Shopping Ads allows you to integrate your feed with Google Ads campaigns. “Surfaces across Google” refers to areas of Google not affected by ads, such as organic search results.
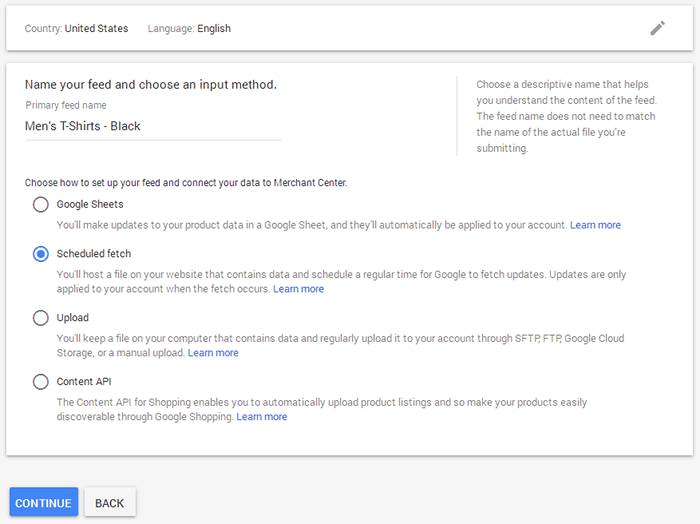
On the next screen, give your feed a name. You can use the same name you gave it in WooCommerce Google Feed Manager. Then, choose the Scheduled Fetch option, and click Continue.
For the Setup screen, enter the file name you used in WooCommerce Google Feed Manager. Then select a Fetch Frequency that matches your update schedule.
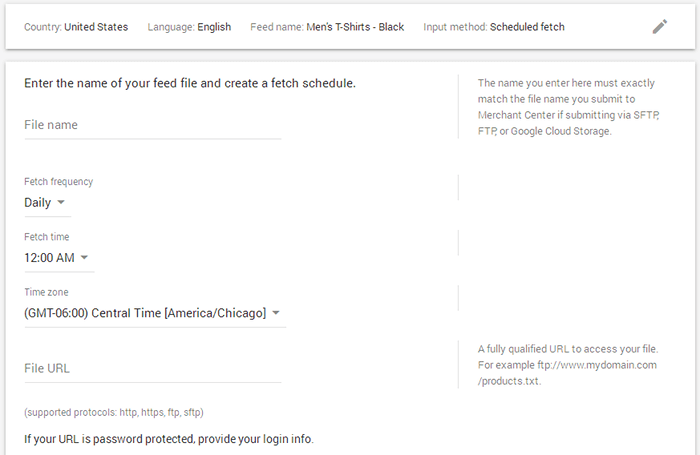
Copy your XML file’s URL, and paste it in the URL field. Since the XML file isn’t password protected, skip this step. Then click Continue to finish uploading your feed to Google Merchant Center.
What Happens Next
The Google Merchant Center dashboard has a few analytics you can use to track the success of your feeds. You’ll find reports on campaigns in your Google Ads account as well.
You’ll need to wait for the numbers to come through. That way, you can determine if Google Shopping is a good fit for your store. While ad-less Google Shopping is still new and has limited data, there are a few things you can do. These will help your campaigns perform better.
The first thing consumers will notice are your products’ images. Make sure your product images are of high quality and in line with your competitors’, especially your featured images.
You can also improve your review marketing and customer service strategies. Customers usually avoid products that lack reviews or have poor scores.
Lastly, do some keyword research. Make sure the products you’re promoting don’t face heavy paid competition.
If you’re looking for other places to promote your WooCommerce store, check out our guide. It covers multi-channel selling and how to integrate your store with Amazon and eBay.
 Shares
