

How to Add A Facebook Pixel to Your WooCommerce Website
How to Add A Facebook Pixel to Your WooCommerce Website
If you advertise on Facebook but still don’t use Facebook Pixel, you miss out on a very powerful marketing tool that can supercharge your ecommerce business.
If you have installed Facebook Pixel on your WooCommerce website, it will allow you to do the following things:
- Measure ROI from Facebook Ads
- Track conversion from Facebook Ads
- Make use of Facebook Ads retargeting feature
So, you should start using Facebook Pixel on your WooCommerce website as soon as possible if you haven’t done it already.
This article will walk you through the process of creating a Facebook Pixel and how to add a Facebook Pixel to your WooCommerce website. But before getting into the step by step process, let’s talk a little about what a Facebook Pixel is and why should you use it on your WooCommerce website for those who don’t know.
Table of Contents
1. What is Facebook Pixel
A Facebook Pixel is a tiny snippet of code provided by Facebook that you add to your website.
You don’t need to understand the code to use it. All you need to do is set up a Facebook Ads account, copy the Facebook Pixel code given by Facebook, and add it to your website. There are many easy ways you can add Facebook Pixel to a website.
- Add the code directly to your website’s source code
- Tag management tools like Google Tag Manager
- Plugins or extensions for the CMSs like WordPress or Shopify
2. Functions of Facebook Pixel
A Facebook Pixel helps you to make your ads more effective and target ads to potential customers who are most likely to visit your WooCommerce store and buy your products.
Track Facebook Ads
With a Facebook Pixel added on your WooCommerce website, you can keep track of conversion from Facebook Ads.
It will help you to get insights about
- Which ads get more clicks
- How far customers go within your website
- How many clicks end up in sales
- How many clicks end up in leads
- How many customers leave the website without buying anything
Having these insights help you to understand which ads are more effective and which ads don’t work so you can optimize the ads to get better results.
Remarketing
Facebook Pixel allows you to target Facebook ads to only those who have visited your WooCommerce website before.
The Facebook Pixel helps you to get the maximum results for your ad spend as these visitors are more likely to make purchases on your WooCommerce store.
You can even filter the visitors who have added products into the cart but didn’t make a purchase and target them with Facebook ads of the product they added to the cart.
Create custom audiences
Adding a Facebook Pixel on your WooCommerce store enables you to make custom audiences on the Facebook Ads Manager platform
You can create groups of different types of audiences from those who have already shown interest in your business or products. You can create custom audiences based on website traffic, app users, sign-ups, and cart abandonment, etc.
Create look-alike audiences
If you have Facebook Pixel on your website, Facebook can create a look-alike audience who are very similar to those who have already expressed interest in your products.
The look-alike audience is more likely to be interested in your business and products as they are very similar to those who have already expressed interest in your products or business.
For example, you can create a look-alike audience of those who have liked your Facebook business page.
3. How to Create a Facebook Pixel For WooCommerce
The first thing you need to do is create a Facebook Pixel for your Facebook business page.
Facebook offers a dedicated Facebook Manager website for advertisers where you can manage your ads and ad campaigns
1. Open Facebook Business Manager
Go to https://business.facebook.com and to open Facebook Business Manager.

If you don’t already have an account on Facebook Business Manager, you create a Business Manager account. You just need to fill the basic information about your business and verify the email.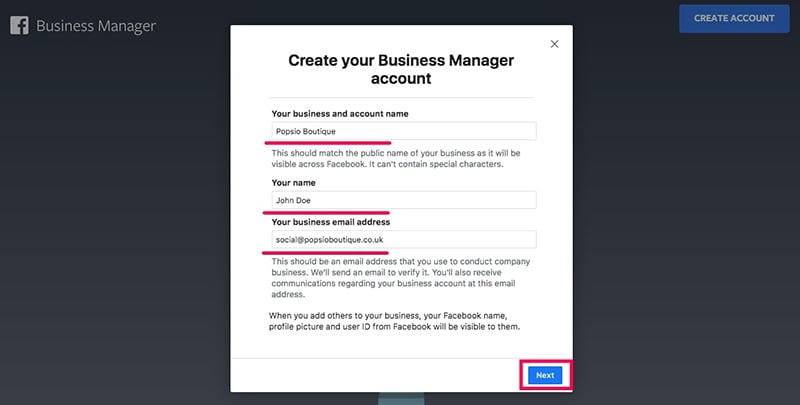
2. Open Pixels section under the Events Manager
To create a new Facebook Pixel, click on the icon with three lines on the top left corner of the page and choose Pixels.
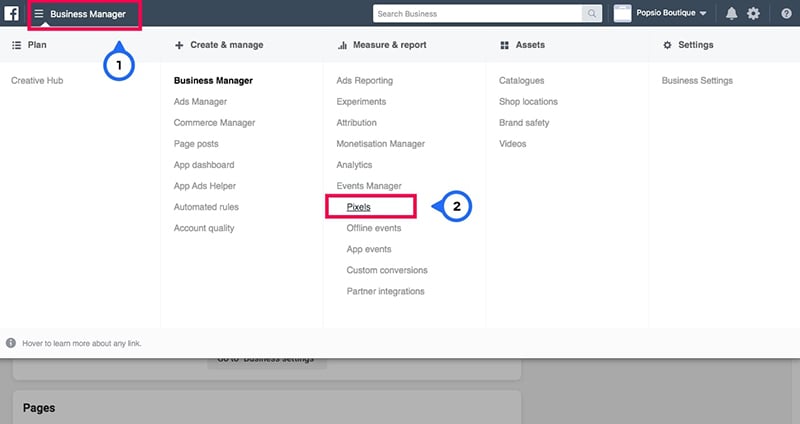
If you don’t see Pixels, click on the All Tools link on the popup to show more options and then choose Pixels.
3. Create a new Pixel
The Pixels section shows information about all your Facebook Pixel codes if you have any. If this is a new Business Manager account, there will be no Pixel.
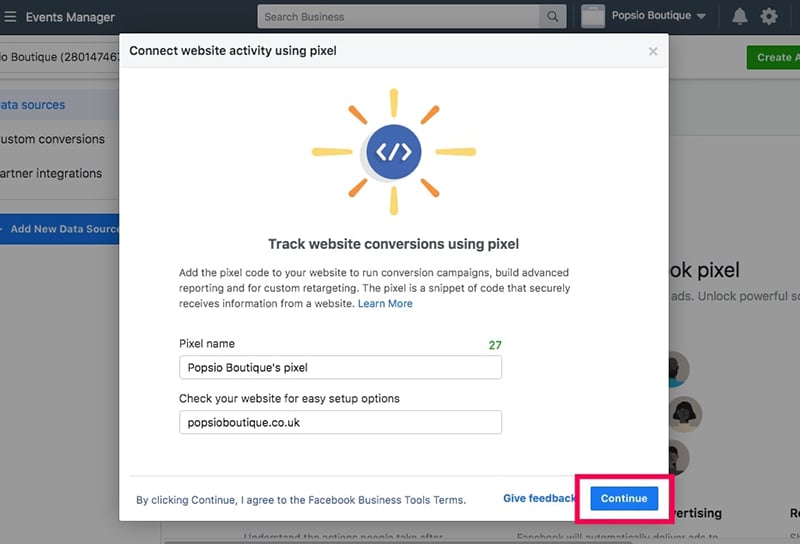
To create a new Facebook Pixel, click on the Create a Pixel button on the bottom.
If you can’t see the Create a Pixel button, you may click on Add New Data Source button and then choose Facebook Pixel.

A new window will pop up where you can create a new Facebook Pixel. Give a name to the Facebook Pixel and enter the URL of your website. Then click on the Continue button.
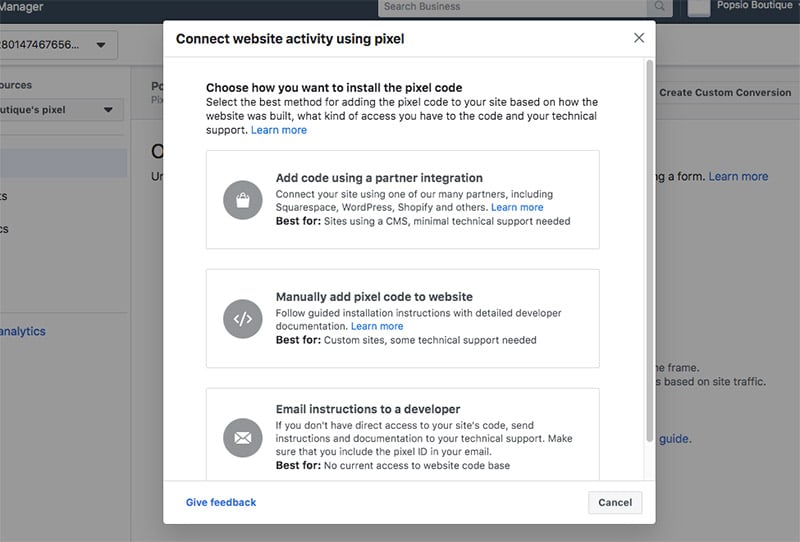
4. Choose a Method to add Facebook Pixel to Your WooCommerce
After clicking on the Continue button in the previous step, you will be presented with three options to add Facebook Pixel to your website.
For WooCommerce users, there are many different ways to add a Facebook Pixel to the website and each method has its own benefits and limitations. But in this article, we will show you only two different ways to add Facebook Pixel to your WooCommerce website.
4. Method 1: Install Facebook Pixel on WooCommerce site using Facebook’s Third-party Integration feature
This is a beginner-friendly method in which Facebook will walk you through the process step and step. It’s easy to configure and chances of making errors very low.
The partner integration option is very simple and requires no programming knowledge because it doesn’t require you to add code manually. All you need to do is download a WordPress plugin, install it on your website, and configure it.
This method is slightly longer but it will help you to import your product from WooCommerce to Facebook easily.
Step 1: Choose Third-party integration method
When you click on the Continue button in the previous step after giving a name for the Pixel and entering your website’s name, you will be presented with three options to add code. From the list, choose Add code using a partner integration.
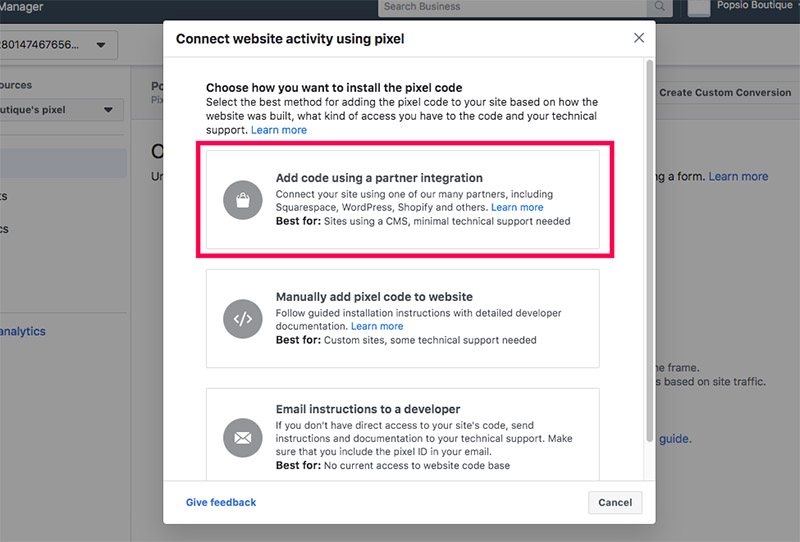
Then you will be presented with a list of various partners in which you can find WooCommerce as well. Click on WooCommerce from the list.

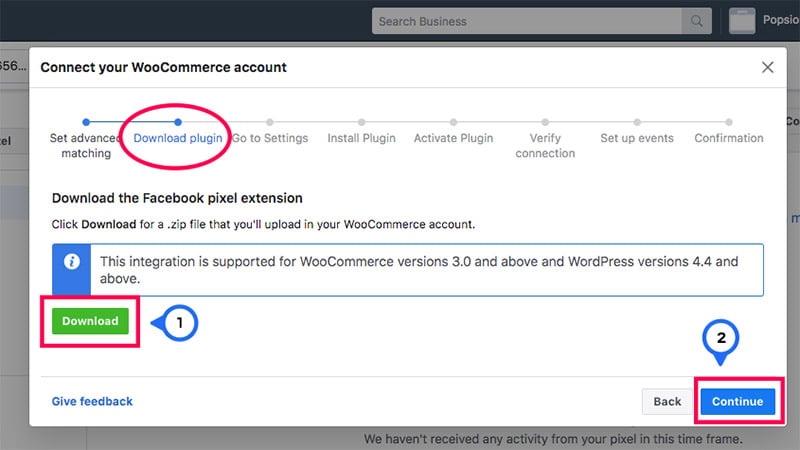
Step 2: Initiate Partner Integration Method
Now you will be taken to a walkthrough window which will guide you through the step by step process of connecting your WooCommerce account with Facebook.
The walkthrough is pretty self-explanatory, and you just need to follow the instructions and click the Continue button at the bottom right corner after finishing each step in the walkthrough.
In the first step of the walkthrough, under Set advanced matching, enable the advanced matching for WooCommerce and then click the Continue button.
Step 2: Download Facebook Pixel extension
In the second step of the walkthrough, click on the green Download button to download the Facebook Pixel extension for WordPress and then click the Continue button.
Step 3: Install Facebook Pixel plugin on your WordPress website
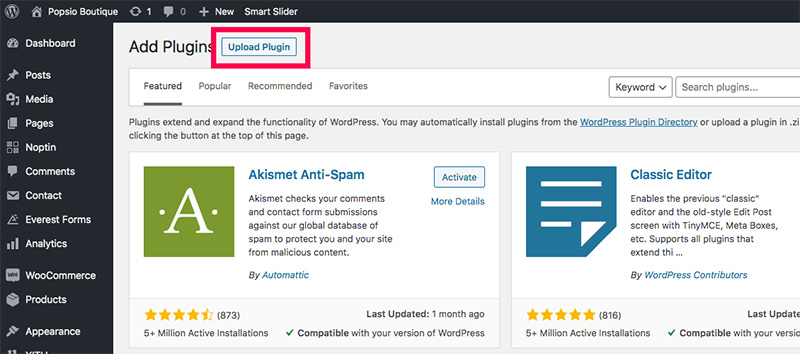
Log into WordPress admin area and visit , go to Plugins > Add New.
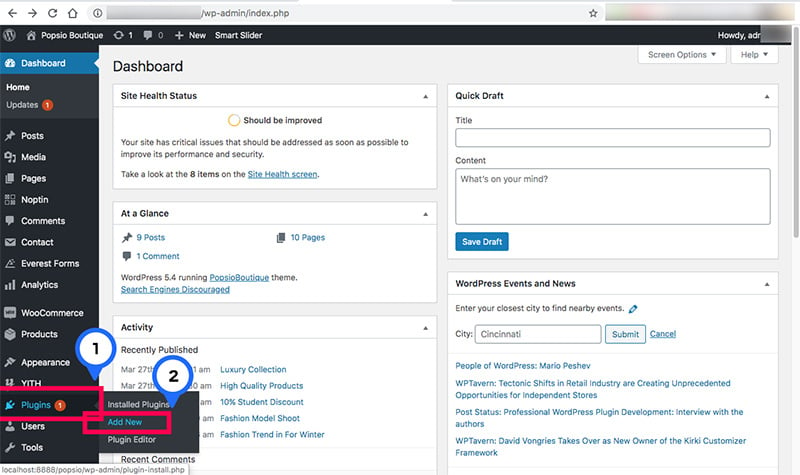
Click on the Upload plugin button at the top of the screen.
You will be presented with a screen to choose and upload the plugin. Click on the Choose file button and select the Facebook Pixel Extension for WooCommerce file you have just downloaded from Facebook.
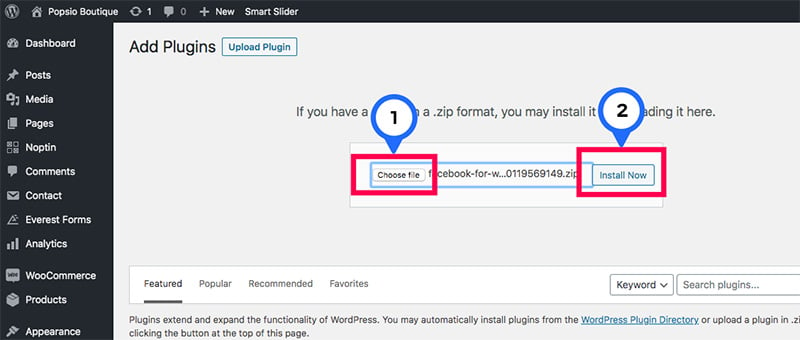
You don’t need to unzip the file. After choosing the file, click on the Install Now button.
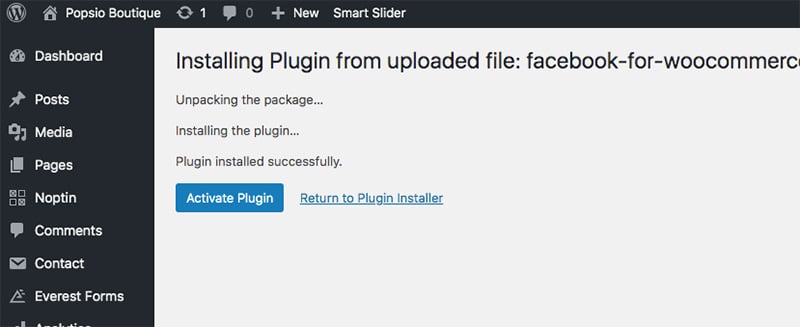
Once the installation is complete, you will see the Activate Plugin button. Click on the button to activate the Facebook Pixel plugin.
Step 4: Initiate Facebook Pixel plugin setup
Once the plugin is installed and activated, you need to configure the plugin to make it work. To start the setup process, click on the complete the setup steps link on the alert box.
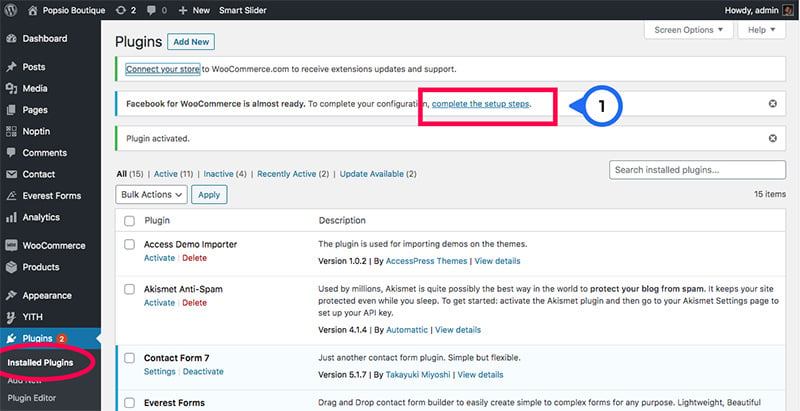
If you can’t see the alert box, you can also click on the setting link under the name of the plugin.
In the next screen, you can see Get Started link at the bottom of the page. Click on the link to initiate the setup process.

Step 5: Setup your WooCommerce store with Facebook
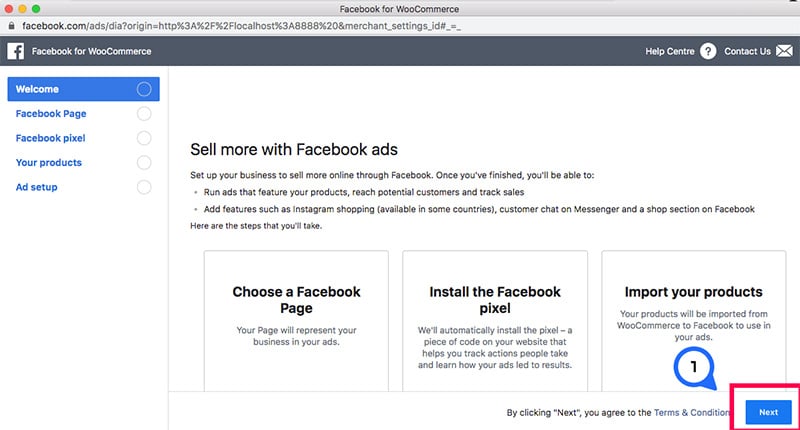
When you click on the Get Started button, a new browser window will open up with a welcome screen to Facebook for WooCommerce configuration.
On the Welcome screen, click on the Next button. You don’t need to do anything here.
On the next screen, select your Facebook business page. You also have the option to enable Advanced Matching which we recommend you to keep enabled. Then click on Next.
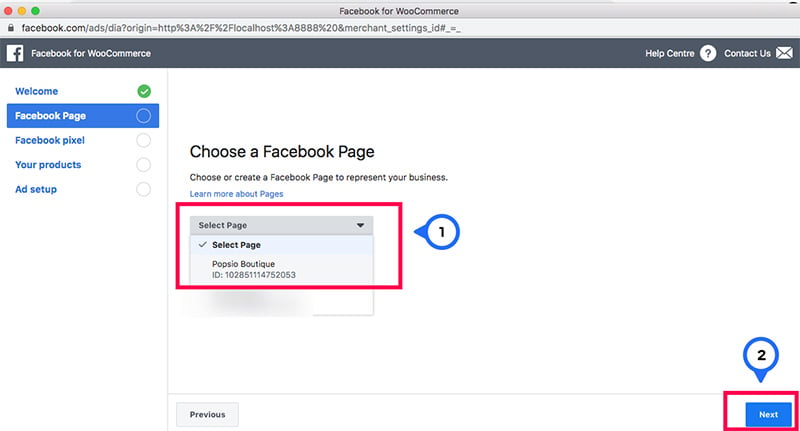
In the third screen, you will be prompted to pick the Facebook Pixel.
![]()
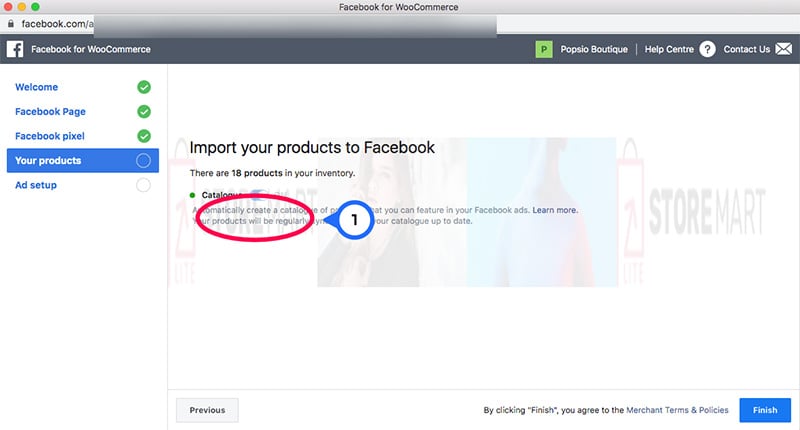
In the next screen, import your product inventory to Facebook. You can enable the Catalog to feature your products on Facebook ads. Then click on the Finish button.
Now you have installed Facebook Pixel successfully on your WooCommerce site and you are set to go.
Facebook also makes it easier for us to verify if the Facebook Pixel is working on your website without any error. You can skip the second method of installing Facebook Pixel on a WooCommerce website and go down to the next section in the article to learn how you can check if the Pixel is actually working.
5. How To Install Facebook Pixel on WooCommerce website with Official Facebook plugin for WooCommerce (Method 2)
This method is faster compared to the first method. However, you will not be able to import the WooCommerce products to Facebook during this process. You may need to do that additionally if you want.
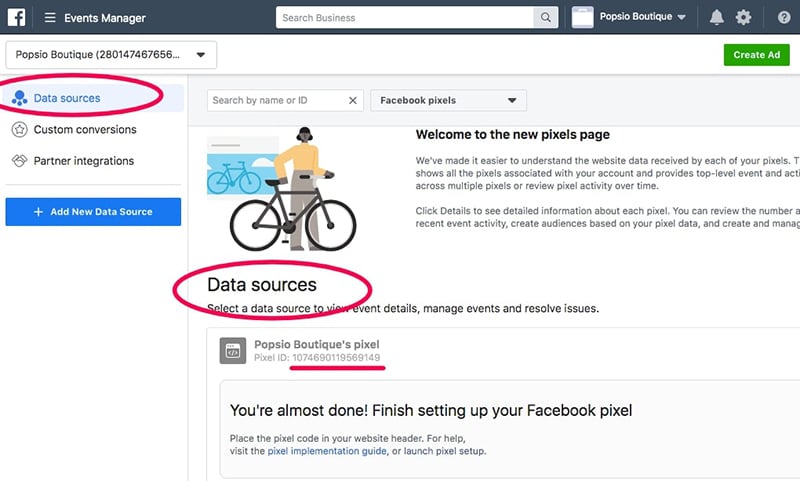
1. Get your Facebook Pixel’s ID
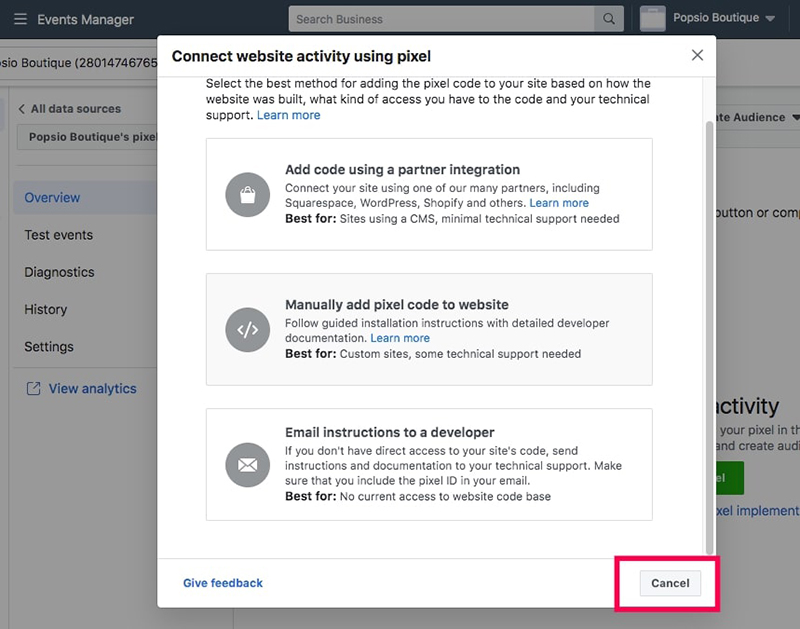
When you create Facebook Pixel, the last step was choosing the method of how you want to install the Facebook Pixel to your website.
You will be presented with three options. Instead of picking an option from the list, click on the Cancel button to close the popup window.
Now you are back at the Data Sources page on Facebook Business Manager where you can the list of all Facebook Pixels you have created so far. In our case, there will be one Pixel which we created earlier.
Under the name of the Pixel, you can see the Pixel ID and all you need to is copy that long digit number.
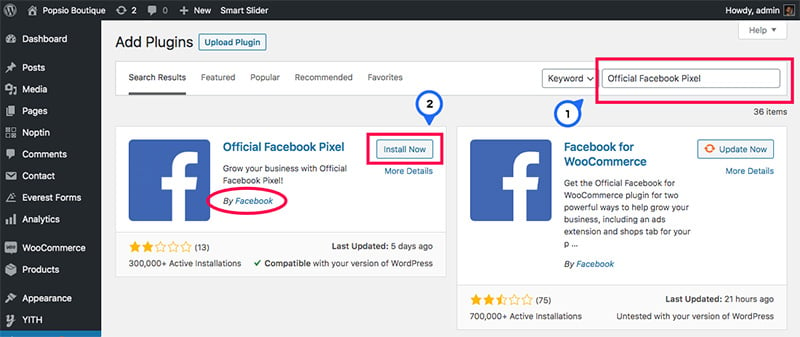
2. Install the Official Facebook Pixel plugin for WordPress websites.
Log in into the WordPress admin area and go to Plugins > Add New.
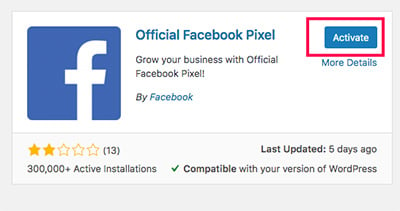
Search for Official Facebook Pixel and install the plugin by Facebook.
After the installation is complete, click on the Activate button.
3. Configure Official Facebook Pixel
Go to your Plugins page by clicking on the Plugins menu on the left sidebar. You can see the Official Facebook Pixel plugin in the list. Click on the Settings link under the name of the plugin to open the plugin configuration page.
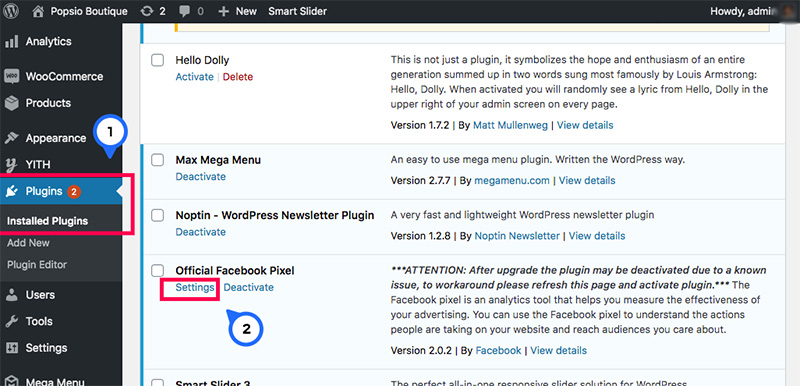
All you need to do is type in the Pixel ID of the Facebook Pixel which you have already copied in the first step of this method.
Paste the Pixel ID into the input field and click the Save Changes button.
![]()
6. How to Test if Facebook Pixel is Working on WooCommerce?
Now that you have successfully installed Facebook Pixel on your WooCommerce website, you need to ensure that it actually works on your website without any error.
1. Install Facebook Pixel Helper Chrome extension
Facebook Pixel Helper extension for Chrome browser will help you to ensure whether Facebook Pixel works properly on a website.
Open Chrome web browser and visit Chrome Web Store and search for Facebook Pixel Helper extension.
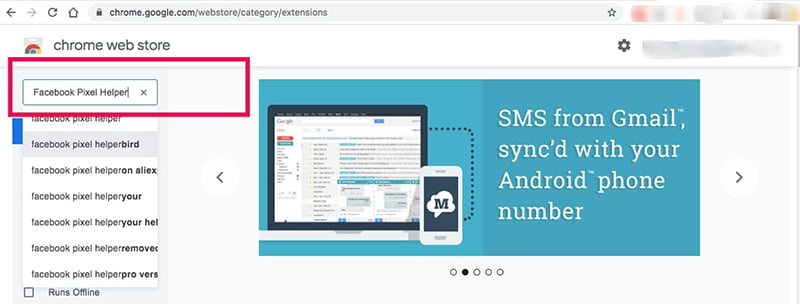
Click on the Add to Chrome button and then Add Extension button on the next popup window to the extension to your Chrome browser
2. Check for errors
A new icon will appear to the right side of the address bar at the top of Chrome for the new Facebook Pixel Helper extension you have just installed.
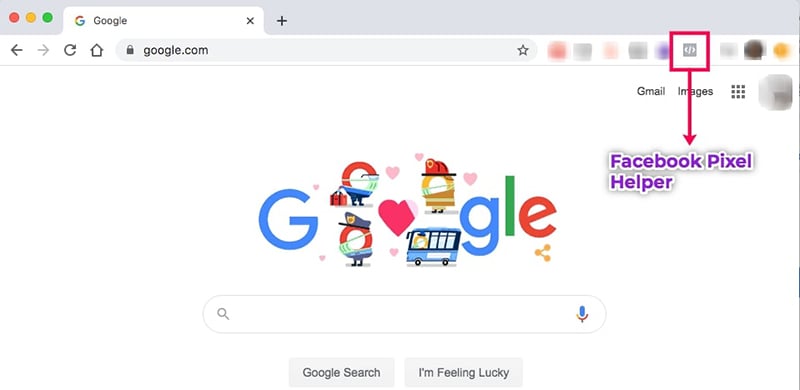
Now visit your WooCommerce website and click on the new extension icon. It will open up a new small window that shows the number of Facebook Pixels on your website and if it is triggered any Event.

You should see at least one Facebook Pixel if you have done the installation process correctly.
At the bottom, you can see the list of events that triggered Facebook Pixel. If the Pixel works fine without any error, you should see a green mark on the left side of the event name.
Any colour other than green indicates that there is an error and you may need to troubleshoot the issue and fix it to make the Pixel work properly.
If you have installed a Facebook Pixel on your WooCommerce store and it is not working correctly. Then simply sign up to a trial Support Plan (1st task is only $1) and we will resolve the issue for you.
Want to experience what trusted eCommerce support feels like? Sign Up For A Trial
 Shares
