

How to add the gift wrapping option on WooCommerce stores?
How to add the gift wrapping option on WooCommerce stores?
People order things for their loved ones for their birthday, holidays, etc. If your online store sells giftable items, it is a good idea to add a gift wrapping option.
The gift-wrapping service may seem like a small convenience but it can make your store a better place for last-minute gift purchases and shoppers may choose your store instead of your competitors.
In this blog, we show you how to add the gift-wrapping option on a WooCommerce store. It will allow shoppers to let you know if they are ordering the product as a gift to someone and write a custom greeting note.
There are many different WordPress plugins that allow you to add the gift-wrapping feature on a WooCommerce store but not all are the same. Each plugin places the feature on the online store at different places and offers different options. In this blog, we use the WooCommerce Gift Wrapper plugin by Little Package.
This is a free plugin that helps you to get the job done but it has its own limitation as well. For example, it doesn’t allow you to add conditional pricing to the gift-wrapping service.
How to add the gift wrapping option on WooCommerce stores
- Install the plugin
Login to the WordPress admin dashboard and go to Plugins > Add new. Search for “WooCommerce Gift Wrapper” and from the results, install the plugin created by Little Package. After the installation, activate the plugin.
- Add gift wrapping service as a product
The plugin we use requires you to add gift-wrapping service as a product. You can create multiple gift-wrapping services if you want but it is better to keep it under 4. For each gift-wrapping service product, you need to give the following details.
- Product name
- Product feature image
- Product price
You need to create a new product category specifically for gift-wrapping service products. Let’s check how to add the gift-wrapping option as a product and add it to a new category.
Go to Products > Add New to start creating a new product.
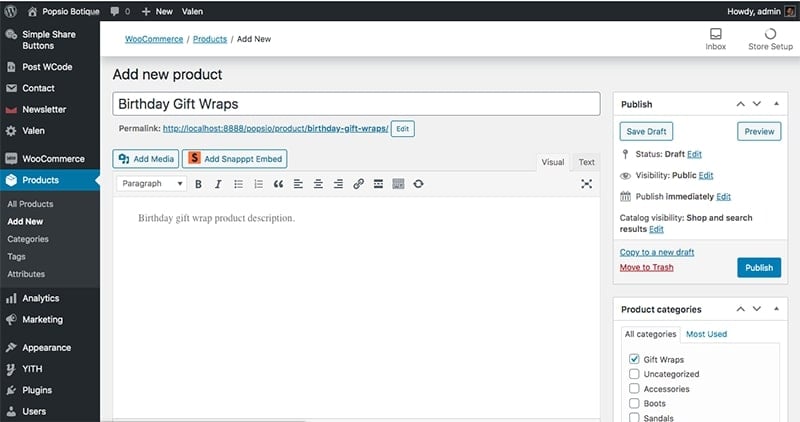
Give a product name
You can give the product any name you want but it is better to keep a meaningful name. Example: Regular gift wrapping, Premium gift wrapping.
Add a featured image
This image should showcase the product to give an idea of how the gift-wrapping will look.
Add a product price
You can give the gift-wrapping service charge as the product price.
Create and assign a category
Create a new product category. The name could be anything but it is better to keep meaningful names. Example: Gift Wrapping
After creating the category, add the newly created gift-wrapping service product to the category.
You can create multiple gift-wrapping service products if you want. All you need to is create a new product, give it a name, add a price, add a featured image, and add it to the Gift Wrapping category. As we said earlier, it is better to keep the maximum number of gift-wrapping options under 4.
- Add gift-wrapping feature to the store
Once you have created the gift-wrapping services as products and added them to the Gift Wrapping service, you can go ahead to add the feature to your online store.
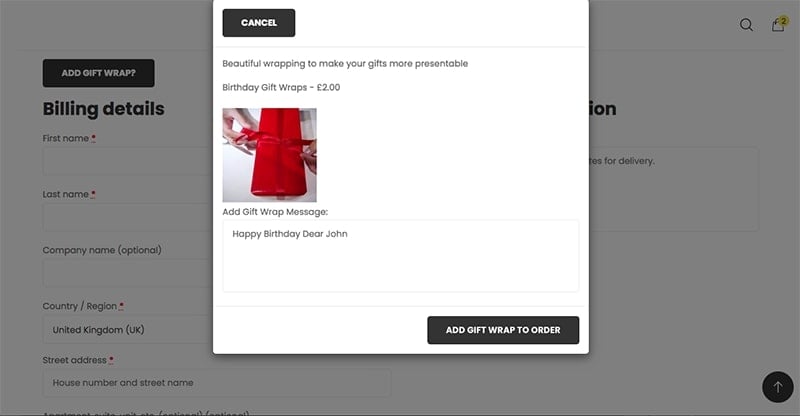
Once the feature is added, the plugin will add a small label “Add gift wrap?” on the Cart page or Checkout page. Shoppers can click on this label and a popup window will open up. On this popup window, shoppers can choose a gift-wrapping option and write a greeting note.
Let’s check how to do add the feature to the WooCommerce store.
Go to WooCommerce > Settings to open the WooCommerce settings page.
Open the Products tab and then choose the Gift Wrapping tab.
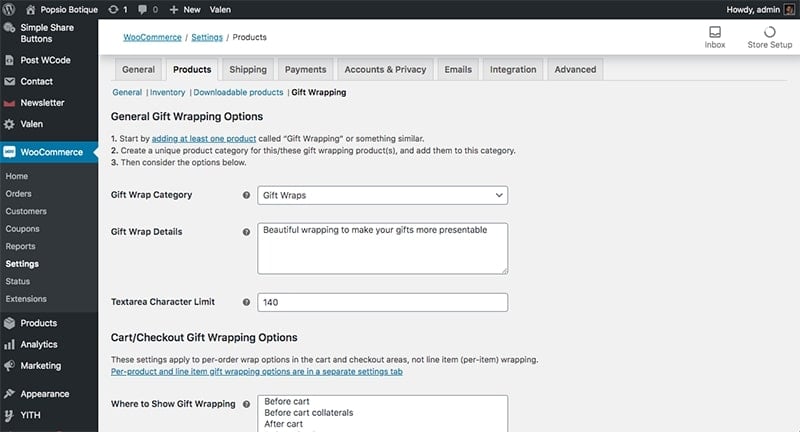
Choose Gift-wrap category
Choose the product category in which you have added the gift-wrapping service products. In our example, the category is Gift Wrapping.
Define text area character limit
Enter the maximum character limit for the text area where shoppers can add the greeting note for the gift.
Cart/Checkout Gift Wrapping Options
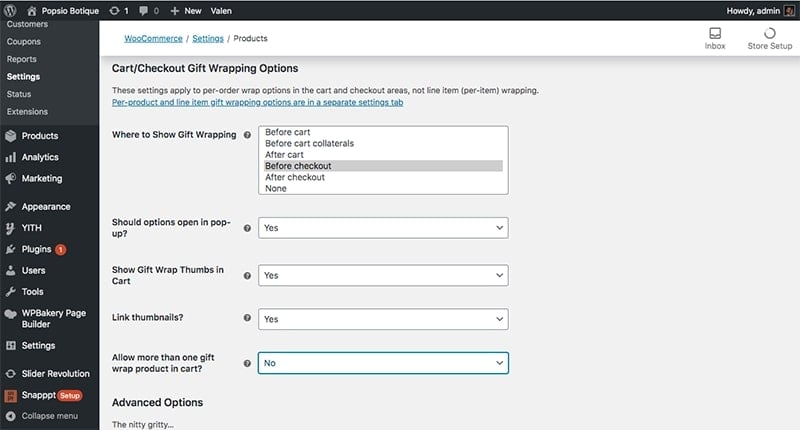
Where to show gift wrapping
This setting allows you to choose where you want to place the “Add gift wrap?” label in your store. You can add it to different places on the Cart page and Checkout page.
We recommend to add it just below the cart items on the Cart page or above the checkout form on the Checkout page.
If you want to place the “Add gift wrap?” label just below the cart items, choose Before cart collaterals.
If you want to place the “Add gift wrap?” label above the checkout form, choose Before checkout.
Should options open in pop up?
This setting allows you to choose how you want to display the gift-wrapping options to the shoppers when you place the order.
If you choose Yes, the options will be displayed on a popup window.
If you choose No, the options will be displayed with the accordion effect.
Show gift wrap thumbs in cart
The gift-wrapping service is added as an additional product on the cart. This setting allows you to choose if you want to display a product thumbnail for the gift-wrapping service product.
You can choose Yes or No but it is not going to affect the functionality of the feature. If you place the “Add gift wrap?” label on the Checkout page, this setting doesn’t matter.
Link thumbnails
Link thumbnail setting allows you to make the thumbnail or link or not. If you make it Yes, shoppers can click on the thumbnail of the gift-wrapping service product from the cart list and go to the product page. It is only recommended if you want to give more details of the product-wrapping service to the shoppers. So, it is better to keep this setting No.
Allow more one gift wrap product in the cart
This setting allows you to limit the number of gift-wrapping service products to one item or not.
If the shopper wants to order more than one product and add gift-wrapping to all of them, you will need to keep it to Yes.
On the other hand, if the shopper order only one actual product and add multiple gift-wrapping service products, it could be a problem. So, you should have an idea of how you will deal with it.
Most people order the only item as a gift. So, you are safe even if you don’t allow more than one gift-wrapping product in the cart. So, it’s better to keep it No.
Advanced Options
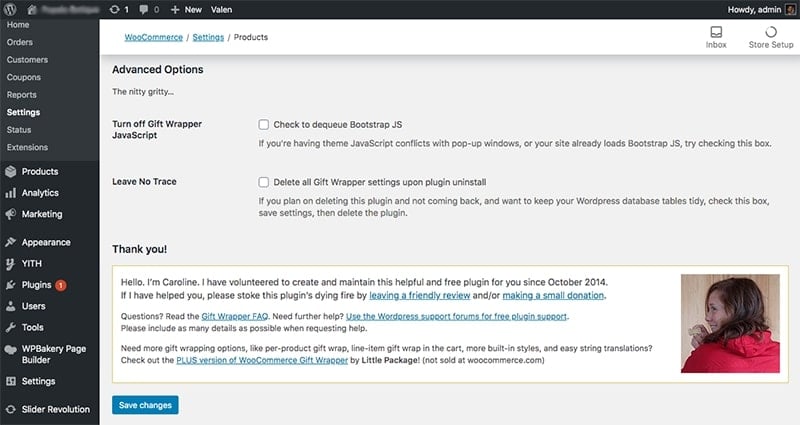
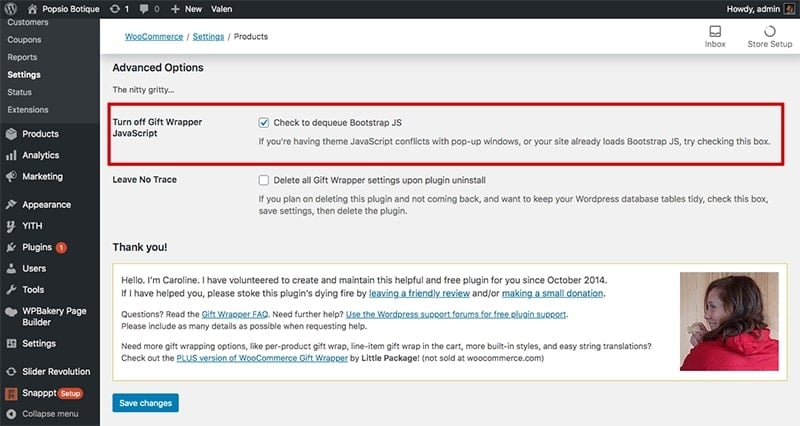
Turn off Gift Wrapper JavaScript
This plugin uses Bootstrap. So, if your theme is already using Bootstrap, this could cause issues.
If the popup is not displayed or gift-wrapping options are not revealed after clicking on the “Add gift wrap?” label on the Cart page or Checkout page, checking this checkbox will fix the problem.
Leave no trace
If you are experimenting if this plugin is the right choice for you and deleting the plugin after checking, you can check this box.
Now you are all set up and all you need to do is click on the “Save Changes” button at the bottom of the page to save the settings.
- Check the gift-wrapping feature in the store
Now is the time to go to the store and check if the feature works properly.
Add an item to the cart, and go to the Cart page.
Depending on whether you have chosen to display the feature, you can find the “Add gift wrap?” label on the Cart page or Checkout page.
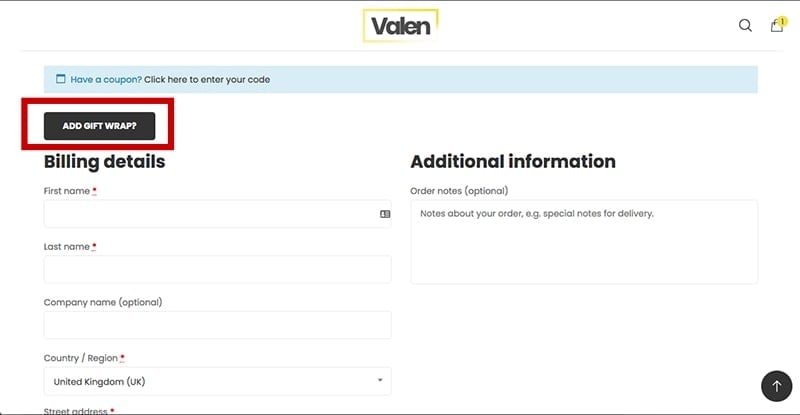
Once you click on it, a new popup will open up or content will be revealed below with an accordion effect.

If nothing happens after clicking on the “Add gift wrap?” label, you may want to check or uncheck the checkbox for Turn off Gift Wrapper JavaScript setting under Advanced options on the plugin settings page.
In the gift-wrapping options, shoppers can choose a gift-wrapping option and write a custom note. The note will be added to the product.
After that, the shopper can click on the Add gift wrap to order button.
Summary
As you have seen, the WooCommerce Gift Wrapper plugin by Little Package makes it very easy to add a gift-wrapping feature to a WooCommerce store. We hope that you can add this functionality to your store without any issue. If you face any problem or you want to customize the style and appearance of the options on the store, please leave a comment below.
Want to experience what trusted eCommerce support feels like? Sign Up For A Trial
 Shares
