

How to Customize WooCommerce Checkout Page
How to Customize WooCommerce Checkout Page
Shopping cart abandonment is a big concern for most eCommerce businesses. The typical cart abandonment rate is nearly 70%.
It means 7 out of 10 people who start a checkout process end up quitting the checkout process due to various reasons.
One of the most common reasons for cart abandonment in online stores is poor checkout experience. If you could fix the user experience issues that make most people abandon the checkout process and optimize the checkout page to make more people finish the order, you can increase your profit significantly.
If you could bring the cart abandonment rate down to around 30%, you can increase your sales by 100%.
But unfortunately, there is no magical checkout process or a checkout page design that will work for all eCommerce websites and customers.
You need to try different best practices and see what gives you the best results.
In this blog, we show you a few different ways you can customize the checkout page in WooCommerce. You can try them to customize your WooCommerce checkout page and see and see if they are helpful.
Table of Contents
- Optimizing & Experimenting with WooCommerce Checkout Checkout Page
- Customize Elements on WooCommerce Checkout Page
- Changing the Visual Design with CSS
- Removing unwanted elements from checkout page
- Method 1: Remove checkout page elements with Plugin
- Method 2: Remove checkout page elements with functions.php file
- How to make a required field not required
- How to rename input field labels
- Creating Custom Checkout Pages
- How to Create a Custom Checkout Page with Cartflows
- Summary
Optimizing & Experimenting with WooCommerce Checkout Checkout Page
There is no single checkout page design that gives the best result for all online stores. The effectiveness of any checkout page design will vary based on many factors like types of products and customers. To optimize conversions, you may need to customize the checkout page in WooCommerce based on your store’s specific needs.
What works on one website may not be that much efficient on another website.
So, you need to experiment with different designs and identify what works best for your eCommerce business to improve the conversion rate.
Analyze
You can start by analyzing user behaviour using data from website analytics tools like Google Analytics and Hotjar.
It will help you to identify the major exit points in your funnel.
Experiment
Once you identify the issues, you can make small changes to address the problem that makes most users abandon the checkout process.
Then again check the user behaviour and see if there is an improvement in the funnel and conversion rate.
Gradually optimize the checkout page by repeating the experiments multiple times and implementing the changes that gave positive results on your websites.
Customize Elements on WooCommerce Checkout Page
Even a small change like changing the colour of a call to action button can have a significant impact on conversion rate. In this section, we discuss the different ways you can make small customization to the WooCommerce checkout page.
Changing the Visual Design with CSS
Most of the premium WooCommerce themes allow site owners to change the visual design to a small extent like changing the colour of important elements.
But if you want full control over the visual design, you need to know a little bit of CSS language. Unlike PHP code, there is nothing much to go terribly wrong when it comes to the CSS. Moreover, the option to backup WordPress and revert back to the backup gives you the safety net.
While changing the CSS rules for elements, you need to ensure that you only target the elements on the checkout page.
WooCommerce automatically assigns the element of checkout page a class called woocommerce-checkout.
<body class="woocommerce-checkout">
So, you can use this as a parent selector to target only the elements on the checkout page. For example, you can change the colour of paragraph texts to blue with the following code.
body.woocommerce-checkout p{
    font-color: #0000FF !important;
}
You can use the following container tags along with their class name to customize the visual design of any element on the checkout page.
<body class="woocommerce-checkout"><form class="woocommerce-checkout"><div id="customer_details" class="col2-set"><div class="woocommerce-billing-fields"><div class="woocommerce-shipping-fields"><p class="form-row"><div class="woocommerce-additional-fields"><div id="order_review" class="woocommerce-checkout-review-order"><table class="woocommerce-checkout-review-order-table"><div id="payment"><ul class="wc_payment_methods payment_methods methods"><div class=" place-order">
You can use the Inspector tool on the browser to find the class names of elements you want to target.
Here the code to change the background colour of the Place order button and make its corners slightly round.
body.woocommerce-checkout .place-order button{
        background-color: #00FF00 !important;
        border-radius: 40px !important;
}
Removing unwanted elements from checkout page
WooCommerce checkout page presents a whole bunch of fields to collect billing details, shipping address, and user information.
If you think that some of them are unnecessary, you can remove them.
Removing fields from the checkout page declutter the page. It makes customers feel less overwhelmed. So, they are highly likely to complete the checkout process which improves conversion rate.
WooCommerce doesn’t have an easy way to disable or remove unwanted input fields from the checkout page. You can do this through two methods.
Method 1: Disable or remove checkout page input fields using Plugin (Paid)
This method is easy but it requires a premium plugin from WooCommerce. Checkout Field Editor plugin by WooCommerce provides an interface to edit WooCommerce checkout page from WordPress admin dashboard. It lets you do two things with input fields in the checkout page
- Remove unwanted fields
- Make input required or optional
Method 2: Disable or remove checkout page input fields using functions.php
You don’t need to buy a plugin to remove unwanted input fields from the checkout page because you can do the same by adding a few lines of code to your functions.php file.
Step 1: Open functions.php file
Login to WordPress dashboard and choose Appearance > Theme editor to open WordPress Theme Editor screen.
Click on functions.php (with the label of Theme Functions) from the list of Theme Files on the right side to open in the Theme Editor.
Step 2: Copy the following code
/**
Remove fields from checkout page
**/
function wc_remove_checkout_fields( $fields ) {

        // list of fields to be removed from the checkout page.

        return $fields;
}
add_filter( 'woocommerce_checkout_fields', 'wc_remove_checkout_fields' );
Step 3: Add the code into functions.php file
In the Theme Editor, scroll down to the bottom of the functions.php and paste the above code at the end.
Step 4: Add the list of input fields to the function
The above code is not complete. You need to tell WordPress which input field on the WooCommerce checkout page you want to remove.
To remove each input field from the checkout page, you need to add a separate line of code.
You can copy the line of code you want from below based on what input field you want to hide and paste it in a new line immediately after the line // list of fields to be removed from the checkout page.
Lines of code to remove different fields from billing section
unset( $fields['billing']['billing_company'] );unset( $fields['billing']['billing_email'] );unset( $fields['billing']['billing_phone'] );unset( $fields['billing']['billing_state'] );unset( $fields['billing']['billing_first_name'] );unset( $fields['billing']['billing_last_name'] );unset( $fields['billing']['billing_address_1'] );unset( $fields['billing']['billing_address_2'] );unset( $fields['billing']['billing_city'] );unset( $fields['billing']['billing_postcode'] );
Lines of code to remove different fields from shipping section
unset( $fields['shipping']['shipping_company'] );unset( $fields['shipping']['shipping_phone'] );unset( $fields['shipping']['shipping_state'] );unset( $fields['shipping']['shipping_first_name'] );unset( $fields['shipping']['shipping_last_name'] );unset( $fields['shipping']['shipping_address_1'] );unset( $fields['shipping']['shipping_address_2'] );unset( $fields['shipping']['shipping_city'] );unset( $fields['shipping']['shipping_postcode'] );
If you want to remove the Last Name field from the billing section and Shipping City from the shipping section, the code you add into the functions.php file will look like the following.
/**
Remove fields from checkout page
**/
function wc_remove_checkout_fields( $fields ) {

        // list of fields to be removed from the checkout page.

         unset( $fields['billing']['billing_last_name'] );
        unset( $fields['shipping']['shipping_city'] );

        return $fields;
}
add_filter( 'woocommerce_checkout_fields', 'wc_remove_checkout_fields' );
Note: Please note that the country code can’t be removed from the billing and shipping section. If you try to remove it, it will cause an error.
How to make a required field not required
You can also make required fields optional on your WooCommerce checkout page if you want. The following code will make the phone number field in the billing section optional.
add_filter( 'woocommerce_billing_fields', 'wc_unrequire_wc_phone_field');
function wc_unrequire_wc_phone_field( $fields ) {
        $fields['billing_phone']['required'] = false;
        return $fields;
}
You can replace the billing_phone with other field names in the billing section to make them optional. Please find the field names below.
- Company: billing_company
- Email: billing_email
- First name: billing_first_name
- Last name: billing_last_name
- City: billing_city
- Postcode: billing_postcode
- State: billing_state
- Address line 1: billing_company_1
- Address line 2: billing_company_2
If you want to make an optional field to a required field, all you need to is change the false to true.
Please remember that you don’t remove the apostrophe and quote symbols from the code.
How to rename input field labels
You can also rename the input field labels using functions.php file. The following code will change
- label for company name input field in the billing sections from Business Name to Name of your business.
- Label of email input field in the billing section from Email to Enter your email address.
add_filter('woocommerce_checkout_fields', 'custom_override_checkout_fields');
function custom_override_checkout_fields($fields)
{
$fields['billing']['billing_company']['label'] = Name of your business';
$fields['billing']['billing_email]['label'] = Enter your email address';
return $fields;
}
Please remember that it’s always better to keep the input label shorter to keep the design clean.
You can replace the billing_company with the following texts to change the labels of different fields in the billing section.
- Company: billing_company
- Email: billing_email
- First name: billing_first_name
- Last name: billing_last_name
- City: billing_city
- Postcode: billing_postcode
- State: billing_state
- Address line 1: billing_company_1
- Address line 2: billing_company_2
Similarly, you can also change the labels of input fields in the Shipping Details section by changing the billing to shipping and changing the name of the input field.
Adding the code below into the above code will change the label of input field for first name in the shipping section from Email to Enter your email address.
$fields['shipping']['shipping_email]['label'] = Enter your email address';
When you add this code, the final code will look like this.
add_filter('woocommerce_checkout_fields', 'custom_override_checkout_fields');
function custom_override_checkout_fields($fields)
{
        $fields['billing']['billing_company']['label'] = Name of your business';
       $fields['billing']['billing_email]['label'] = Enter your email address';
        $fields['shipping']['shipping_email]['label'] = Enter your email address';
return $fields;
}
You can replace the shipping_email with the following to change different fields in the shipping details section.
- Company: shipping_company
- Email: shipping_email
- First name: shipping_first_name
- Last name: shipping_last_name
- City: shipping_city
- Postcode: shipping_postcode
- State: shipping_state
- Address line 1: shipping_company_1
- Address line 2: shipping_company_2
Creating Custom Checkout Pages
WooCommerce doesn’t offer much control to website owners when it comes to customizing the page. It doesn’t have the flexibility to replace the default checkout process with a more optimized checkout process easily.
But with CartFlows, you can create custom checkout pages for WooCommerce websites easily.
CartFlows is an amazing tool that helps non-programmers to create and implement beautiful custom checkout flows on WooCommerce websites without writing code.
A Flow in CartFlows contains three elements:
- Landing page
- Checkout page
- Thank you page
Features and advantages of Cartflows
- Create custom checkout pages
- Order bumps
- Upsells down sells, and discount integrated to the checkout process
- Custom thank you pages
- Easy to use (No coding knowledge required)
- Free and premium templates are available
- Support all major WordPress page builders
- Ability to add new conversion-optimization elements can be added
The ability to create custom checkout pages gives you the flexibility to optimize your checkout page and improve the conversion rate.
You can include various elements to make the buyers reassure their decisions to buy the product from you. Some of the examples include:
- Guarantee badges
- Return policy statement
- Testimonials

How to Create a Custom Checkout Page with CartFlows
The biggest advantage of CartFlows is that it makes designing and implementing custom checkout pages on WooCommerce way a lot easier.
However, in this guide, we focus only on the custom checkout page.
It supports all major WordPress page building tools including Divi Builder, Elementor, and Beaver Builder. In this guide, we use the Elementor page builder to customize the prebuilt checkout page offered by CartFlows.
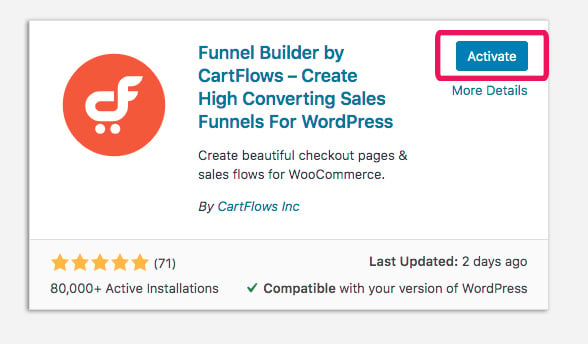
Step 1: Add CartFlows plugin to WordPress
In the WordPress admin dashboard, go to Plugins > Add new to open the WordPress plugin repository (collection).
In the search field, search for Cartflows

You will see CartFlows plugin among the results. Click on the Install button and then the Activate button to activate the plugin.
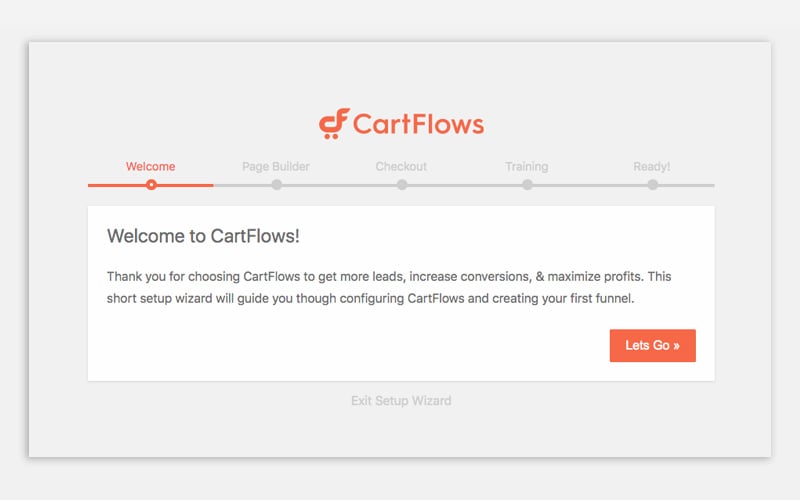
Step 2: Configure CartFlows
Once you install and activate the CartFlows plugin, you can see an alert box two buttons in the Plugins page.

Click on the Setup wizard button to open the wizard and go through the steps.
When you go through the steps, don’t forget to install your favourite page builder in the second step.
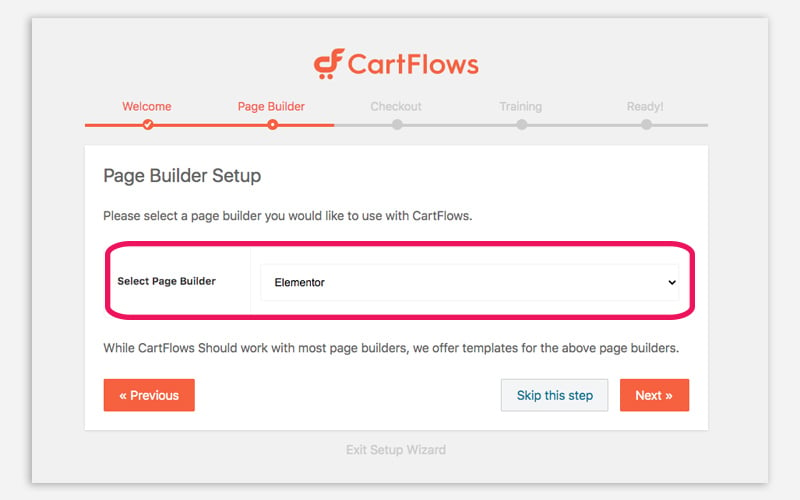
If you can’t see the link to the setup wizard, install a page builder plugin from the WordPress plugin repository. Go to Plugins > Add New to open plugin repository.
Search for Elementor in the search field. Click on the install button for the Elementor plugin from the result and then activate it.
Step 3: Add new Flow in CartFlows
Click on CartFlows menu in the left sidebar to open the plugin start creating a new Flow.
In the next screen, click on Add New to create a new Flow in CartFlows

Now the Flow Library screen will pop up which contains a list of Pro and Free templates for various page builders.
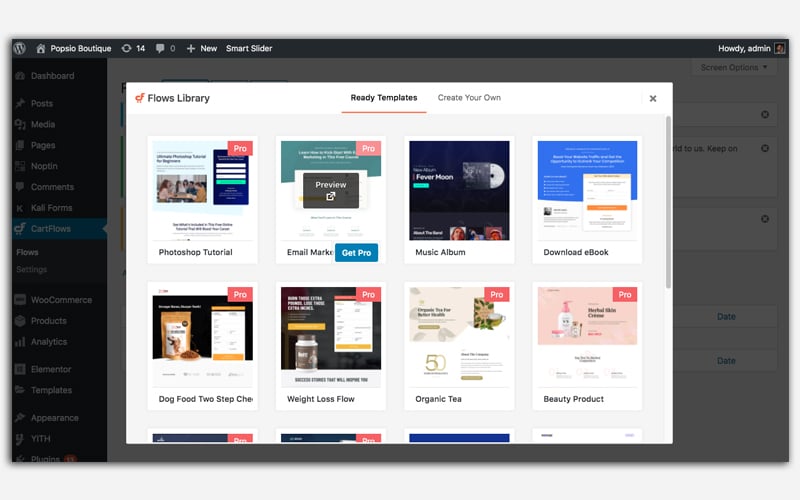
CartFlows allows you to create a flow in two ways
- Using the prebuilt templates
- Building a flow from scratch
If you are already familiar with the page builders, you can start creating from scratch.
But we recommend you to start with a template and customize it to get a hang of the various checkout page features provided by CartFlows.
Step 4: Choose a template
CartFlows offers lots of free and pro templates suitable for various types of products.
Let’s choose the free Evergreen Products 01 template from the list.

Hover your mouse over the thumbnail to view the Import and Preview buttons for the template.
If you want to see how the template will look on a website before you use it, you can click the Preview button to see the template’s demo on a new browser tab.
Click on the Import button to use the template for the new Flow. It will take a few seconds to import the template and create a new Flow in our CartFlows.
Step 5: Configure the Flow
After the import is complete, you will be taken back to the CartFlows dashboard page.
First, give a name to the Flow.
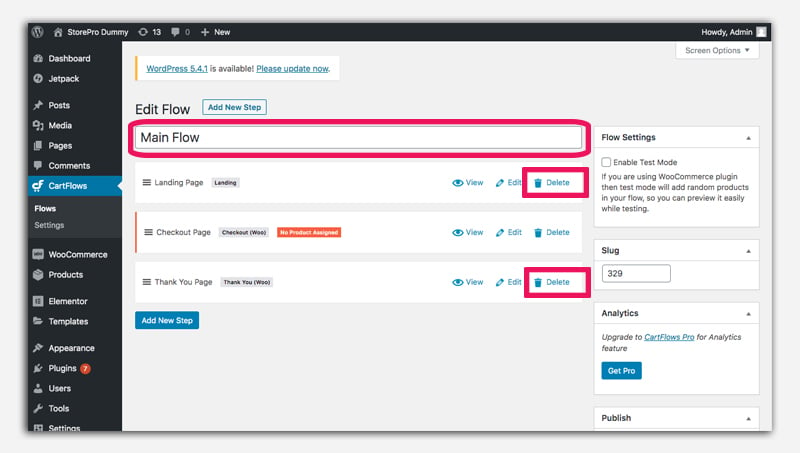
As we told earlier, a flow will contain
- Landing page
- Checkout page
- Thank you page
But we just need the checkout page
So, delete the landing page and thank you page.
Then click the Update button on the right side of the screen to save the changes.

Step 6: Edit custom checkout page
Click on the edit button on the right side of the checkout page to open the WordPress editor screen.
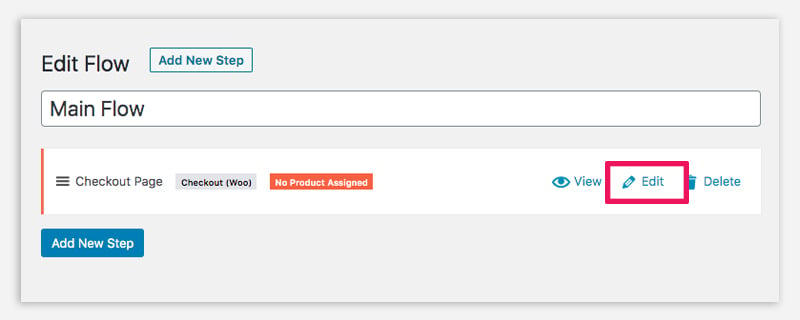
Under the checkout layout, click on the Checkout Design tab to get the options for changing the design of the checkout page.
Don’t forget to enable the Advanced Options.

Step 7: Customize the new custom checkout page (Optional)
Since we have already installed the Elementor plugin, you can customize the checkout page any way you want by using the Elementor page builder.
Click on the Edit Elementor button to open the page on Elementor.
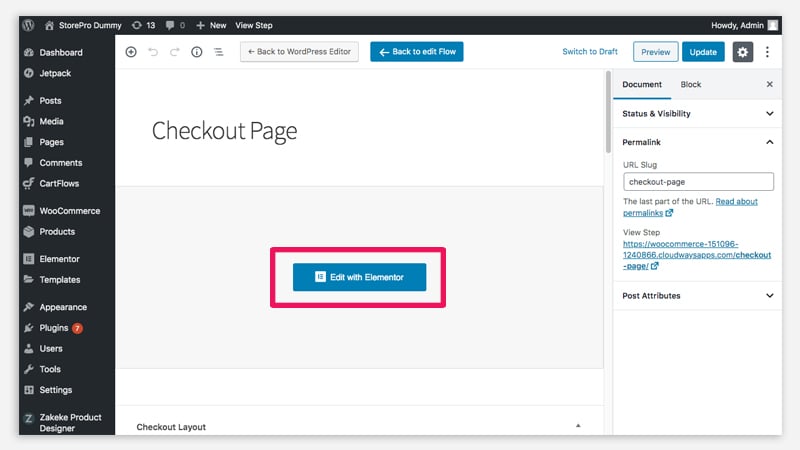
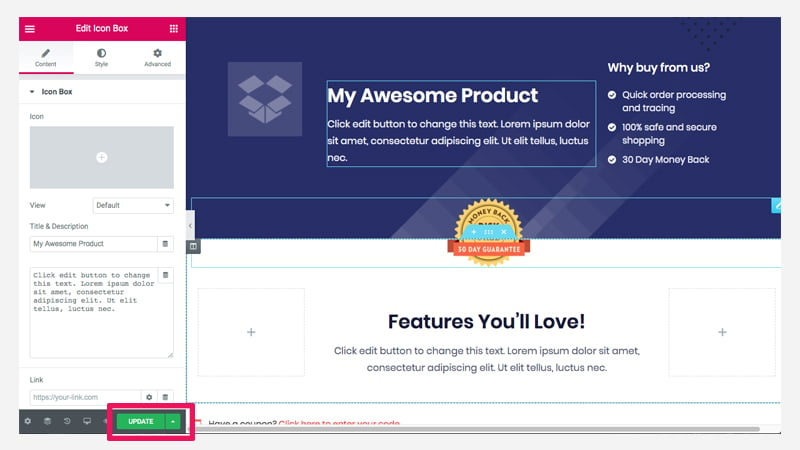
Elementor is a drag and drop page builder and it’s pretty easy to add new elements and features to the page. You can customize the page if you want.
After making all the changes, click on the Update button to save the changes.
Step 8: Make the new custom checkout page WooCommerce global checkout page
Now we have successfully created a new checkout page and customized it to improve the conversion.
The next step is to make it our global checkout page.
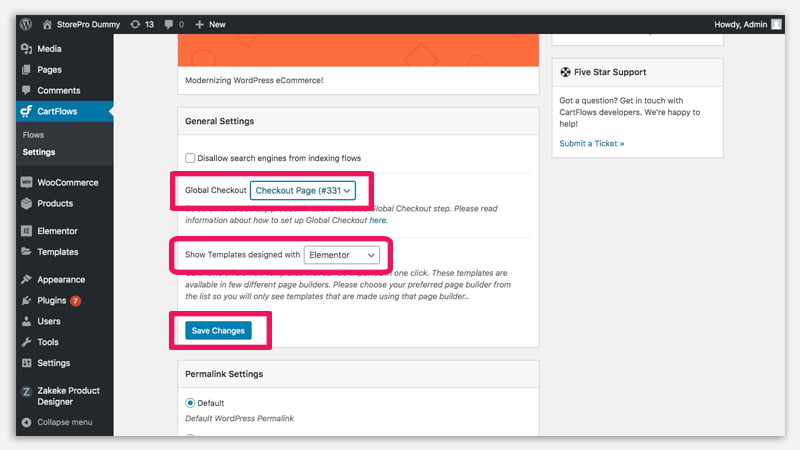
In the WordPress dashboard, go to CartFlows > Settings to open the configuration page for CartFlows.

Under General Settings, you can see the field to choose Global Checkout for WooCommerce. Choose the checkout page you have just created from the dropdown list, and click on the Save Changes button to replace the default WooCommerce checkout page with the new optimized custom checkout page.
Summary
Although WooCommerce doesn’t offer the flexibility to customize the WooCommerce checkout page by default, there are many different methods you can use to optimize the checkout page.
If you want to reduce the cart abandonment and increase conversion rate, you can customize the checkout page in different ways based on various conversion optimization best practices.
It is only through constant experimentation and analysis that you will understand what checkout page design and tactics give best results for your eCommerce businesses.
So, try different optimization techniques on your eCommerce checkout page and check if they reduce checkout abandonment.
Want to experience what trusted eCommerce support feels like? Sign Up For A Trial
 Shares
