How to display custom product badges on WooCommerce
How to display custom product badges on WooCommerce
Customers’ attention is automatically drawn to highlighted information. When you have a wide collection of products in your store, it’s a good idea to highlight products on sale, new arrivals, and featured products, etc. to grab the attention.
Showing badges like “50% Off”, “Deal”, or “New” on particular products on the product listing page helps to highlight your special products. Without those badges, customers may not even know about the deal or the extra information. So, a badge is helpful to highlight products on the deal and new products which can increase the conversion rate.
WooCommerce shows badges for products on sale, but unfortunately, there is no option to create a badge for new products or show the percentage of the discount. In this blog, we show you how to create custom product badges on WooCommerce that will help you to increase the conversion rate on your online store.
WooCommerce shows only the special badge for products on sale. But if we want to add other types of badges, we have to create a custom feature on WooCommerce. In this blog, we show you how to add custom product badges or labels on WooCommerce with Badge Management for WooCommerce by phoeniixx.
Step 1: Install the plugin
After log in to the WordPress admin dashboard of your WooCommerce store, go to Plugins > Add New.
Search for “Badge Management for WooCommerce” and install the plugin by phoeniixx. After the installation is complete, don’t forget to activate the plugin.
Step 2: Plugin walkthrough
Once the plugin is activated, it will add a new option labeled “Badges” in the left sidebar of the WordPress admin dashboard.
Under Badges, there are three options: Badge list, Add badge, and Settings.
Under the Badge list, you can see all the custom badges you have created. Now, it may be empty because we have just installed the plugin.
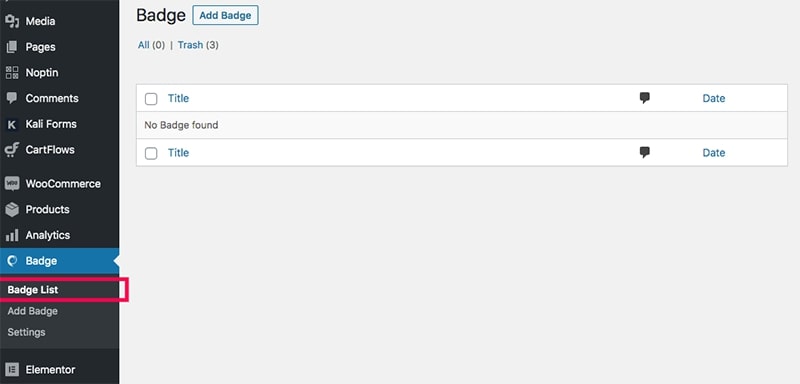
Under the Add badge, you get the options to create new badges. You can create two types of badges: Text badge and Image badges.
Text badge allows you to create badges with custom text, custom background colour, and custom font colour.
Image badge allows you to choose from a list of 5 badge images provided by the plugin.
Under Settings, you can enable or disable the plugin and hide the default on sale badge.
This plugin is very simple and straightforward.
Step 3: Add a new badge
Go to Badge > Add Badge to create a new badge for the product.
First, give a name to the badge. You can give a name like “New”, “Deal”, or “50% off”. This text is for backend use only and this is not the label that will be displayed on the front end.
So, give an appropriate name.
Under the Badge Options, there are two sections. You can create a text badge or an image badge.
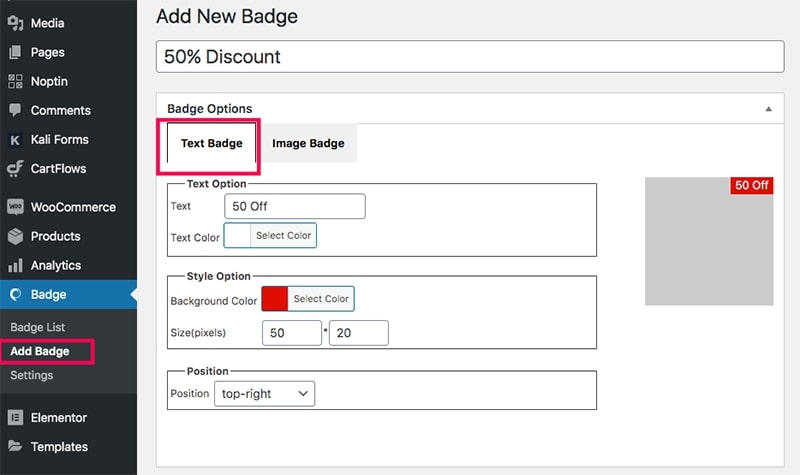
As we said earlier, the text badge allows you to create a badge with
- custom text,
- custom background colour,
- custom font colour,
- and adjust the width and height of the badge,
On the other hand, Image badge allows you to choose from a list of 5 badge images provided by the plugin.
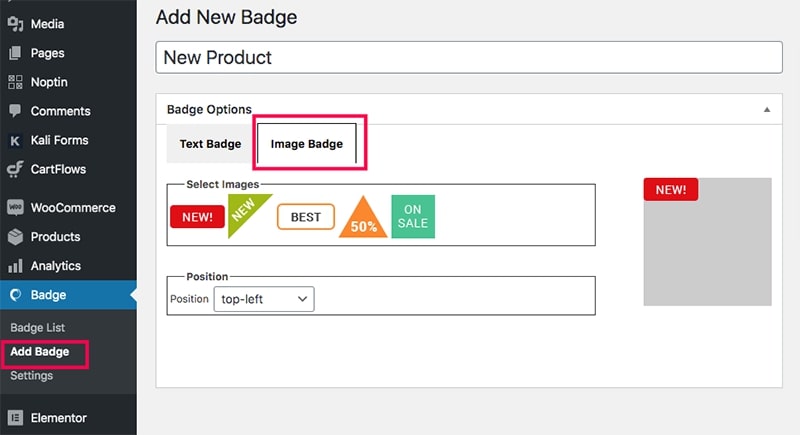
Once you choose an image badge or create a custom text badge, choose a position to determine where you want to display the badge. It’s better to keep it on the top right or top left corner.
But you may run into a problem when our custom badge and the default Sale badge overlap each other. You can solve this issue by disabling the default Sale badge or choosing a position for the custom badge that does not conflict with the position of the default Sale badge. If you want to disable the default bade, you can do it from Badge > Settings.
Once you start filling the information to create a new custom badge, click on the “Publish” button to save the badge. If you have already published and made changes to the badge, don’t forget to click on the “Update” button to save the changes.
You can create as many text and Image badges as you wish.
Step 4: Assign a custom product badge to a product
Now that we have created a custom badge, the next thing we need to do is assigning this badge to a product so we can see this in action.
Go to Products > All Products from the WordPress admin dashboard. Open any product to start editing. It’s better to choose a product that is shown first on the Shop page. It makes finding this product in the store a lot easier.
After opening the Edit page for the product, scroll down to the bottom. In the right sidebar, just above the Product Gallery option, you can see a new box with the title of “Badge box.” Here you can apply the custom badge you created earlier to the product.
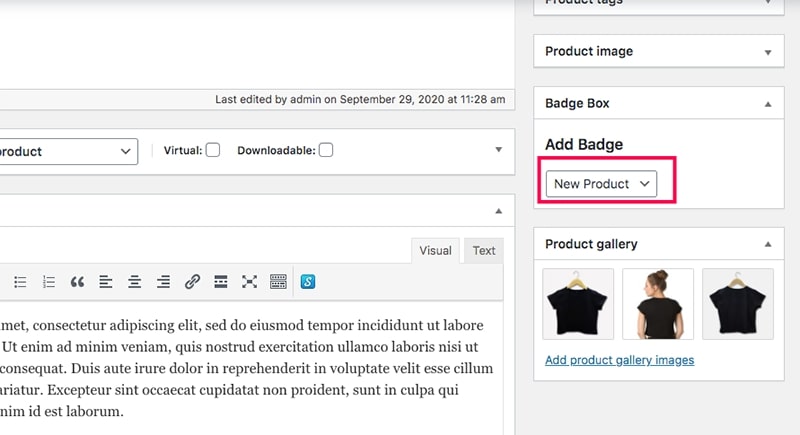
Once you have chosen the custom badge, click on the “Update” button to save the changes.
Step 4: View the custom product badge
Now we have successfully added a custom badge to a product. If you go to the store and open the Shop page or the product page, you can see that our custom badge is applied to the product you edited in the previous step.
You can repeat step 4 to add the custom badges to more products as you wish.
Summary
Badge Management for WooCommerce is a simple and useful plugin by phoeniixx that helps you to add custom product badges on WooCommerce stores. The free version is more than enough to do the job but if you want advanced options, you can buy their premium plan. But if you are willing to pay for the plugin, there are better options. If you need a free version, this is the best one that works without any glitches.


 Shares