

How to Use A CDN with WooCommerce
How to Use A CDN with WooCommerce
If you have ever been looking for tips and techniques to speed up the loading time of your website, you might have come across the word CDN at least once.
Using a CDN for WooCommerce to deliver the content of your website is one of the most effective and easy-win strategies to improve the page loading speed of a website. It’s even recommended by search engines like Google.
A CDN can dramatically reduce page loading time, improve site performance, and do much more. In this blog, we provide an overview of what a CDN is, why it’s useful, and how to use a CDN to speedup a WooCommerce website.
What is a CDN? An Overview
Before we get into the meat and potato of this blog, how to use CDN with WooCommerce and WordPress, it doesn’t hurt to start by reviewing the concept of a CDN.
CDN stands for Content Delivery Network and it refers to a group of connected servers to optimize the delivery of static content to the website visitors.
You can think of a CDN as an additional storage unit to store the static files on a website or application. This storage unit is a network of connected servers (edge servers or nodes in CDN language) that are located in different parts of the world.
What makes a CDN for WooCommerce so special is that it can deliver content or resources on a web page to the visitor far more quickly than your original server can do. There are many more benefits for using a CDN and we will come to that in a moment.
A CDN works in conjunction with the origin server in which the website is hosted. Here is how they work together.
1. Contect to the CDN
A website is connected to a CDN service by changing the nameservers of a domain name to the nameservers of CDN service.
Depending on whether the CDN is push CDN or pull CDN, the static content on the website like images, CSS and Javascript documents, audio files, and fonts are transferred from origin servers to the CDN servers differently.
In a push CDN, the origin server sends content to the CDN service and the CDN caches the content on its servers across the world.
In a pull CDN, the CDN service pulls the content from the origin server when a visitor requests a file and the CDN then caches the file in its edge servers.
2. DNS Connection Redirect
When a visitor wants to open a page from the website, the browser sends a DNS request to the DNS server. Then the DNS server sends the IP address of where the website is stored back to the browser.
When you use a CDN service, it’s the IP address of the CDN service that the browser receives.
3. Request is sent to the CDN server
Once the browser gets the IP address of the CDN server, the browser sends a request for data to the CDN server.
When a CDN receives a request, it routes the request to an edge server closest to the user or best performing available edge servers.
Then the edge server processes the request and gets the file ready to be delivered to the visitor.
4. Content is delivered from the CDN servers to the user
The CDN delivers the static files to the web browser from its edge server.
If the nearest CDN server doesn’t have a file stored or the store files are expired, the CDN will get that file from the next nearest server or original server, save it, and deliver it to the visitor.
Special note: If you update a CSS file on your website, its copy on the CDN is not affected. So, you will have to refresh the cache of a CDN to save the latest copy of the CSS file in the CDN. Otherwise, website visitors can’t see the changes you made. You can find more on this below.
Why a CDN is Useful – Benefits
The idea of adding another layer of CDN to the server may seem counterintuitive because it makes the hosting system sophisticated and complicates the content delivery.
But the truth is you can reap huge benefits by utilising a CDN. Let’s go through some of the advantages of using CDN for websites.
Offload content delivery load from the original server
Integrating a CDN with your hosting helps you to bypass the delivery of static files like CSS and Javascript files, images, audio files, and fonts, etc. which can drastically reduce the load and bandwidth usage in your origin server.
Reducing the bandwidth usage saves you from upgrading your hosting plan to an extent.
Reducing the load on the server helps you to handle requests from more visitors at the same time.
Handle traffic spikes
eCommerce websites often experience huge spikes during holiday seasons and while running sales promo campaigns. If the website is not prepared for that, it may overwhelm the server and cause downtime which is really bad for your business.
With a CDN for WooCommerce in place, the overload due to the unexpected spike in traffic is distributed to CDN servers as well.
CDNs have state of the art hosting infrastructures, so they can handle the surge in traffic efficiently.
Warning: It does not mean that implementing CDN will enable you to handle any amount of traffic to your website. A CDN reduces only the bandwidth usage and server load associated with the delivery of static contents like images.
Bypass concurrent download limits
When you visit a web page, the browser may download dozens of (sometimes more than 100) files to show the page to you. All that happens in the background.
But browsers limit the maximum number of concurrent HTTP connections or the simultaneous downloading of multiple files from a single domain. For most modern browsers, this limit is 6.
Since browsers can’t have more than 6 concurrent HTTP connections at a time from a domain, the browser blocks other HTTP connections from that particular domain.
The remaining connections are only made after the previous downloads are complete.
This limit can be bypassed by using a CDN for WooCommerce, allowing your store to load faster by fetching static content from multiple domains.
Since the CDN delivers its content from its own server and domain name, HTTP connections with CDN are not counted among the HTTP connections with the origin domain.
So, you can have 6 more concurrent connections in the browser if you use a CDN.
Ultimately, it helps you to download the resources faster which increases the page loading speed.
Super-optimized servers
If you are a small or medium business, you may have relatively good hosting but it’s very unlikely that they are as good as the hosting of Google, Microsoft, or Amazon.
CDNs offer well-optimized hosting with higher availability, low network latency, and low packet loss that you can compare with Google and Amazon servers.
Distributed data centers to serve the global audience
All other things being equal, a web page will load faster to a visitor nearest to the server compared to a visitor far away from the server.
As the distance from the server to the website visitor increases, packet loss and network latency are also increased which ultimately causes slow loading.
This is a real concern for websites that target visitors globally or from two distant geographical locations.
For example, an online store targets customers from the UK and the USA.
If the website is hosted on a server in the UK, it will load faster to the UK customer but slower to customers from the US.
On the other hand, if the site owner decides to host on a server from the US, it affects the UK customers negatively.
This is where CDN comes to the rescue.
Since a CDN has data centers (servers) distributed all over the world, it can deliver the content from a data center that is nearest to the visitor.
So, the CDN may deliver the static files from its New York server to visitors from the US whereas it delivers the same files (or rather the copy of the files) from its server in London to a visitor from the UK.
Ultimately, it reduces the distance between the website visitor and server which increases the page loading speed.
Usage Analytics
Most CDN service providers offer usage reports which can be used as a supplement to the data from the website analytics tool. It will give you simple information like how many people have downloaded a PDF or an audio file.
DDoS protection
CDN adds another layer of security to a website. It analyses web traffic for suspicious patterns and blocks DDoS attacks.
DDoS is a malicious attack to overwhelm a website’s server with tons of fake traffic. It causes server overload and disrupts the normal traffic.
When an ecommerce website is subjected to a DDoS attack, it may see a huge spike in traffic but they are not real customers. It also causes server overload and downtime which will hurt the sales as real customers can’t use the website to make orders.
How to Use CDN with WooCommerce Website
Now that you have a strong idea of what a CDN is, how it works, and why it’s useful, the next logical step is learning how to implement a CDN on a WooCommerce website.
In this guide, we use Cloudflare CDN which is one of the most popular CDN service providers. Here is a step by step process of installing Cloudflare CDN on our Popsio Boutique’s online store built with WordPress and WooCommerce.
1. Measure the current page loading speed of your website
The first thing you need to do before trying anything to improve the performance of a website is measuring the performance of the website before making the changes. It helps you to compare the difference in performance and page loading speed after making the changes.
To measure the page loading and various other performance metrics of your website, you can use the following tools.
Please ensure that you run the multiple tests and note down the best time for page loading speed.
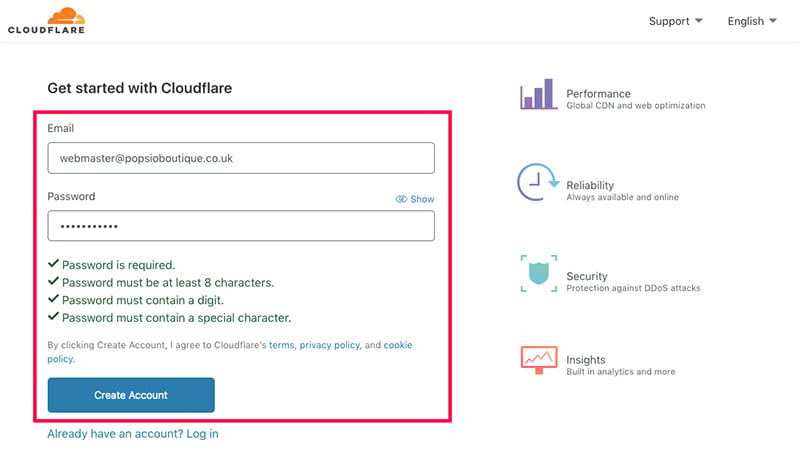
2. Create an account on Cloudflare website
You need to have an account on Cloudflare to use their CDN service on your website. So, navigate to the Cloudflare website and click on the Sign Up button to start creating the account.

Enter your email address and a new password for the account.
3. Add your website to Cloudflare
In the next screen, enter the main URL address of your WooCommerce website.

You don’t need to include the http:// or https:// of the website address.
4. Choose a Cloudflare plan
Next you will get a prompt to choose a Cloudflare plan, choose the Free plan.

Once you confirm the plan, Cloudflare will begin to scan your website’s various domain records.

The scanning process may take a few seconds.
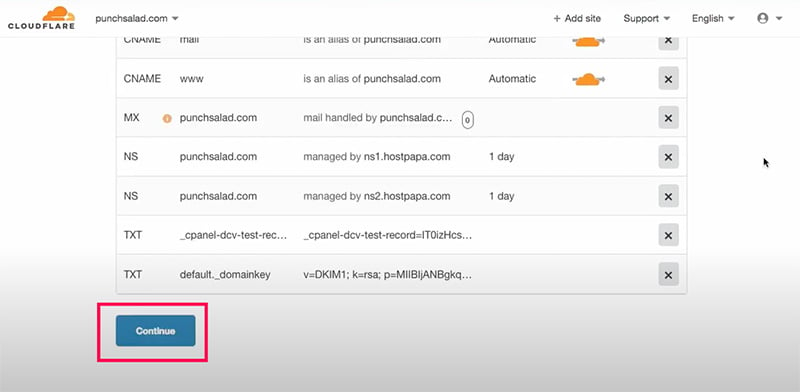
Once the scanning is complete, Cloudflare will show you an overview of your domain records.
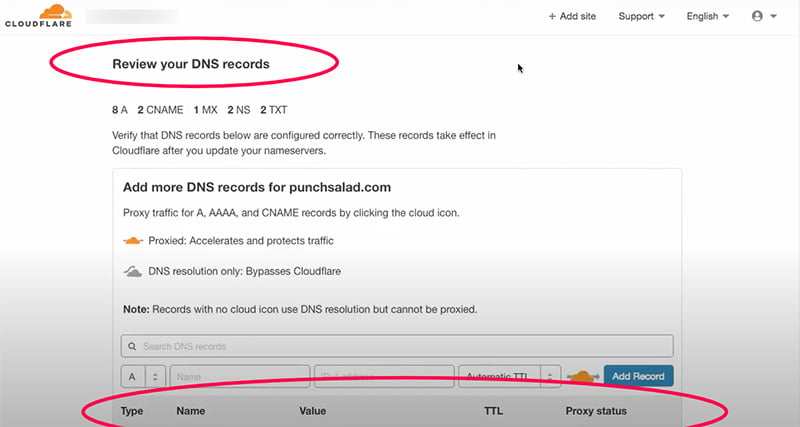
Scroll down to the bottom of the list and click the Continue button.
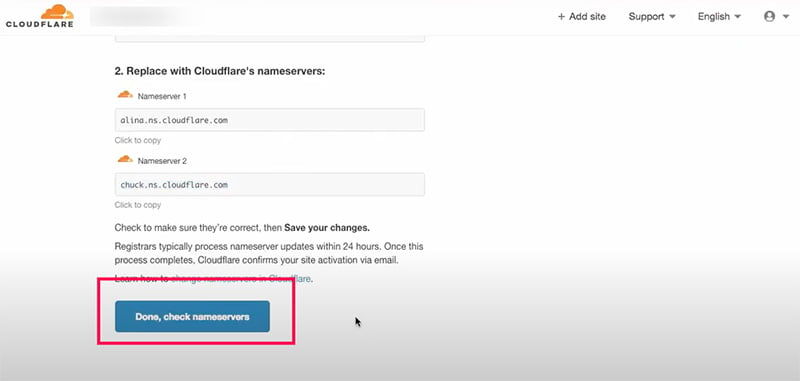
5. Copy Cloudflare nameservers
Once you click the Continue button in the previous step, you will be taken to the Change your nameservers page.

On this page, you can see the current nameservers of your website and the new nameservers provided by Cloudflare.
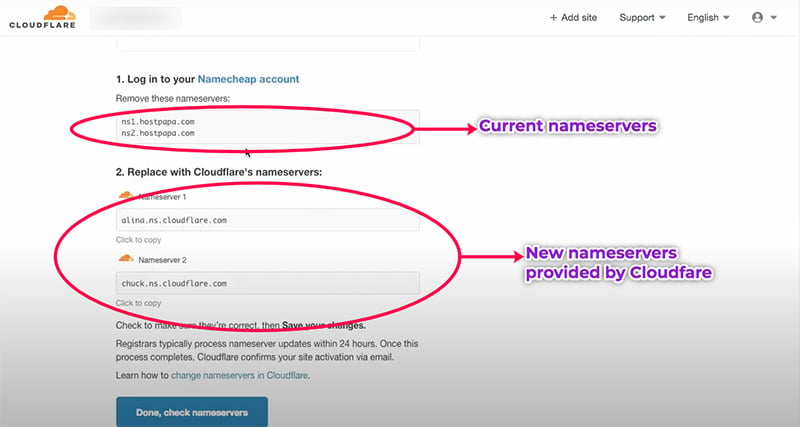
The next thing you need to do is replacing your current nameservers with Cloudflare nameservers.
6. Manage your domain
Log in to your account in your domain name service provider website, go to domains, and click the manage button next to your domain name.
If you don’t know how to do it, you can check the documentation on your domain name service provider’s website to learn how to change nameservers.
In the domain name management page, scroll down to see mameservers.
If applicable, choose custom DNS to enable the option of adding external nameservers.
You can see one or two nameservers, remove them and replace it with the nameservers provided by Cloudflare in the previous step.
Note: It’s better to note down the default nameservers because you may want to revert back in the future.
Save the recent changes by clicking the Save button.
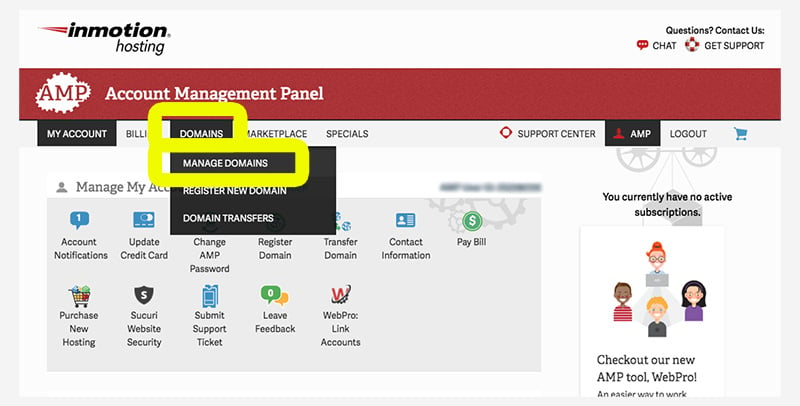
Here is how to change nameservers on the Inmotion Hosting website.
Login to the Account Management Panel of Inmotion Hosting.
Go to Domain > Manage Domains
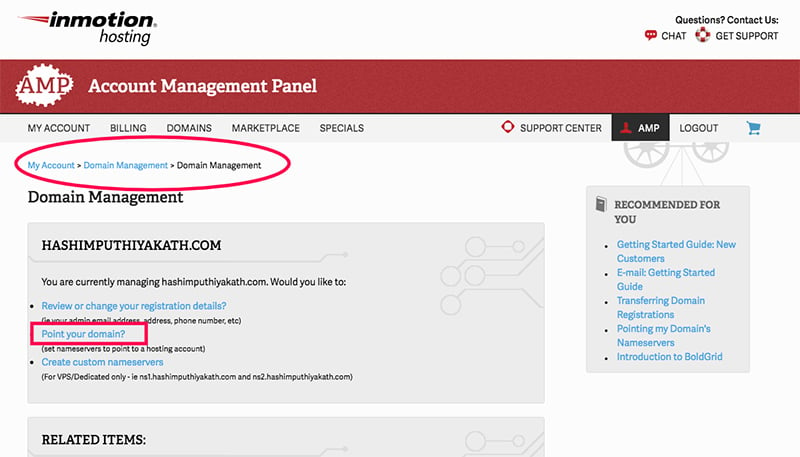
Click on the domain name of your website in the list domain names.

Click on Point your domain to go to the screen where you can change the nameservers.
The next screen will show you your current nameservers.
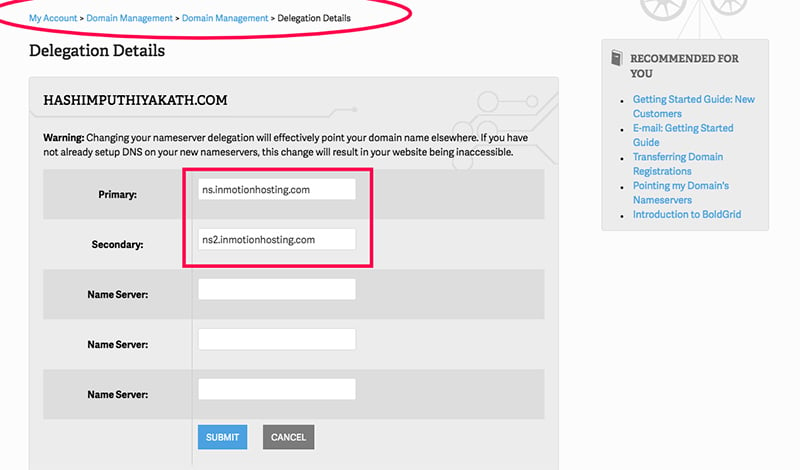
Replace them with the nameservers provided by Cloudflare and click the Submit button.

It may take up to 48 hours for the changes to take effect but most of the time, it will take effect within a few minutes.
7. Save changes in Cloudflare
After replacing the old nameservers of your domain name with the nameservers of Cloudflare in your domain name service provider’s website, go back to the Cloudflare website, and click on the Done, check nameservers button.
Once you hit the button, Cloudflare will check if the changes you made in your domain names have taken effect.
If the request to change the nameservers has not completed yet, Cloudflare will take you to Complete your nameserver page.
Cloudflare will automatically check if the nameservers changes of your domain name have taken effect. You can also check this anytime by clicking the Re-check now button at the bottom.
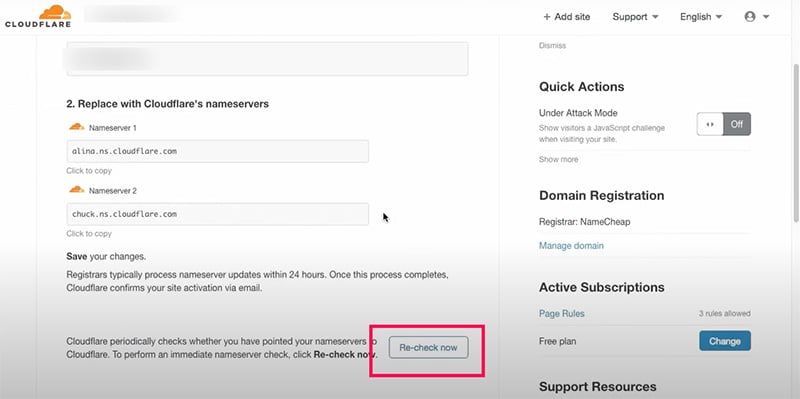
If the page still shows Re-check, come back and check if the nameservers have been successfully changed after 10-15 minutes.
Once Cloudflare identifies that your domain name uses Cloudflare nameservers, you will get a confirmation alert on the page like the following.
Congratulations! Your website is now active on Cloudflare.
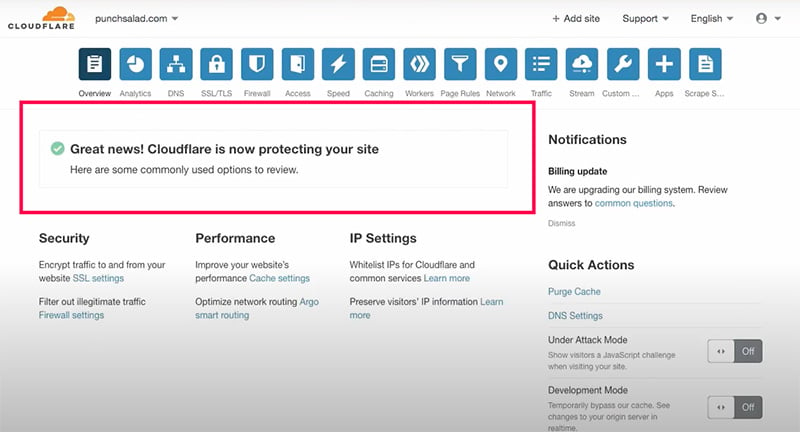
It means Cloudflare identified that your website’s domain name now uses Cloudflare nameservers. Now
- All traffic to your website is routed through Cloudflare network
- Cloudflare will optimize the traffic for speed and security
- Cloudflare will filter out bad traffic (DDoS attacks)
- Check if your website load correctly
Any error while making changes like this might break a website. So, go to your website and ensure that your website works fine.
8. Re-check your website’s speed
To check whether using Cloudflare CDN could improve the speed of your website, run a speed check again. You can use the same tools you have used in the first step.
Compare the recent result with the previous results and see if there is an improvement in the page loading time and performance.
99% of the time, the performance and page loading will improve.
However, it might also affect the website negatively in rare cases. So, it’s a good idea to check whether your website has a positive or negative impact by using Cloudflare CDN.
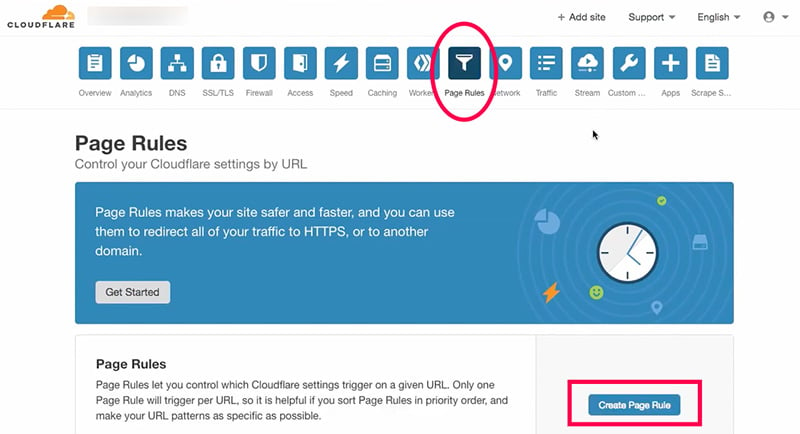
9. Bypass cache for WordPress admin dashboard
You may want to disable Cloudflare CDN caching for the WordPress dashboard pages because you will be making changes here all the time. If CDN caching is enabled for WordPress dashboard pages, you will not see the changes in the dashboard pages.
Go to Page Rules settings page in the Cloudflare dashboard and click on the Create Page Rules button.
In the next screen, enter the domain name of your WordPress website in the following format in the field for page URL.
Popsioboutique.co.uk/wp-admin*
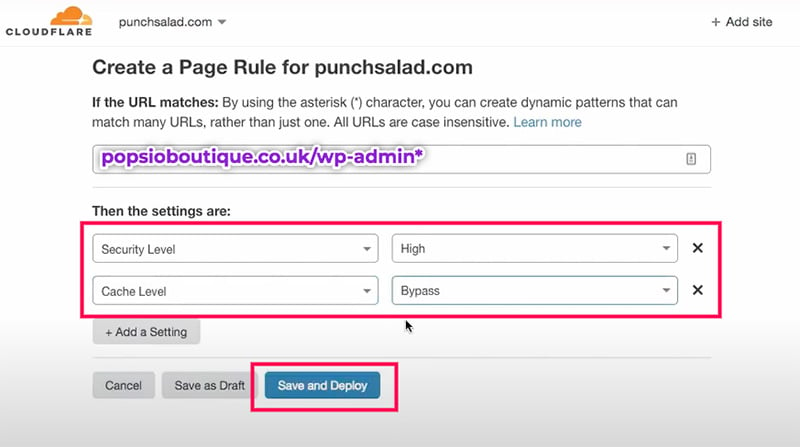
Don’t forget to add the * (star or asterisk) symbol at the end and there is no space before * symbol.
Under Then the settings are: title, choose Cache Level from the drop-down list.
For the field in the right, choose Bypass from the dropdown.
Then click on the Save and Deploy button to save the changes.
This will prevent Cloudflare CDN from caching your WordPress admin dashboard pages.
Install the Cloudflare plugin on WordPress
Once you connect a WordPress website with Cloudflare, it’s a good idea to install the Cloudflare plugin on the WordPress dashboard. It enables you to control Cloudflare from the WordPress admin dashboard.
1. Install the Cloudflare Plugin
After logging into the WordPress dashboard, go to Plugins > Add new to go to the WordPress plugins repository page.
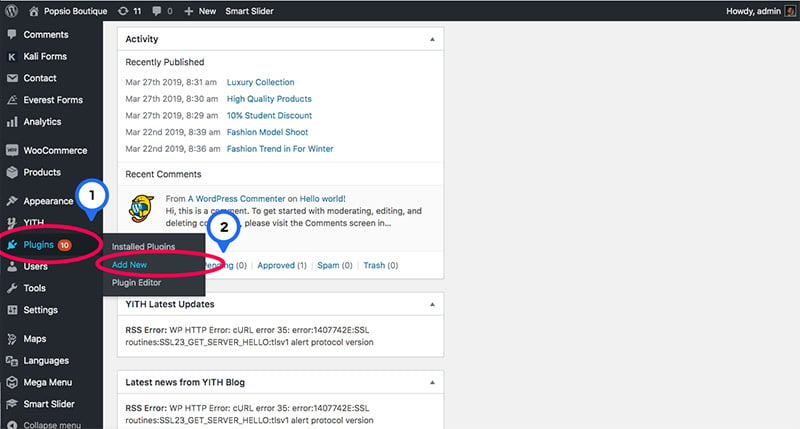
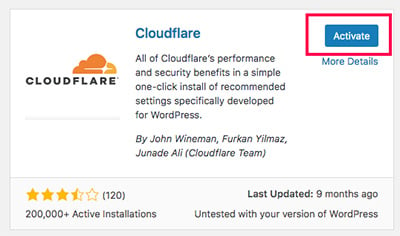
Search for Cloudflare and install the plugin by John Wineman, Furkan Yilmaz, Junade Ali (Cloudflare Team).

Don’t forget to activate the plugin after the installation is complete.
2. Set up Cloudflare plugin
In order to control the Cloudflare account from WordPress using the Cloudflare plugin, you need to build a connection between them. It’s done by using an API.
In the WordPress admin dashboard, go to Settings > Cloudflare to open the Cloudflare plugin settings page.
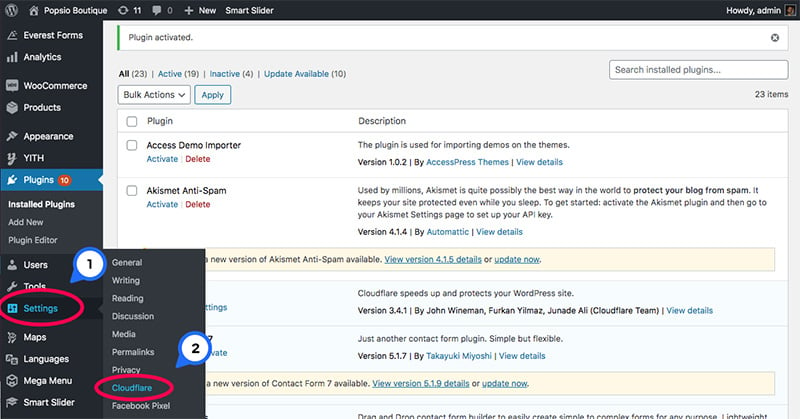
Click on the sign in link to open the Cloudflare sign in form.
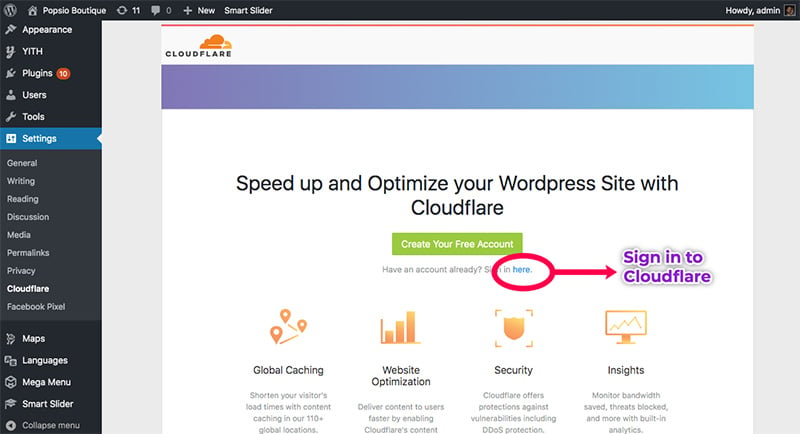
Enter the email address you used while creating the account on Cloudflare.
3. Copy API key from Cloudflare account
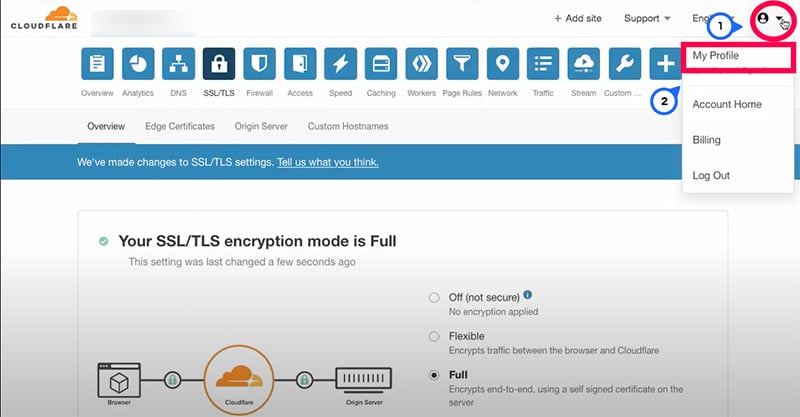
To get the API key, go back to the Cloudflare website. Sign in to your account if you are signed out.
In the top right corner, click on the down arrow icon and choose My Profile from the dropdown menu.
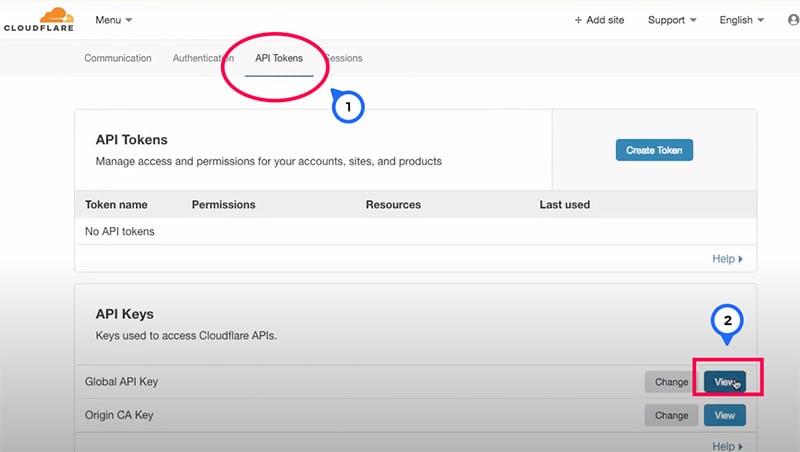
On the next page, choose the API Tokens tab. Under API Keys, click on the View button to the right of Global API Key.
Cloudflare will prompt you to enter the account password. Enter the password, complete the captcha verification, and click the View button.

Now Cloudflare will show you the API key. Copy the API key and go back to the WordPress admin area.
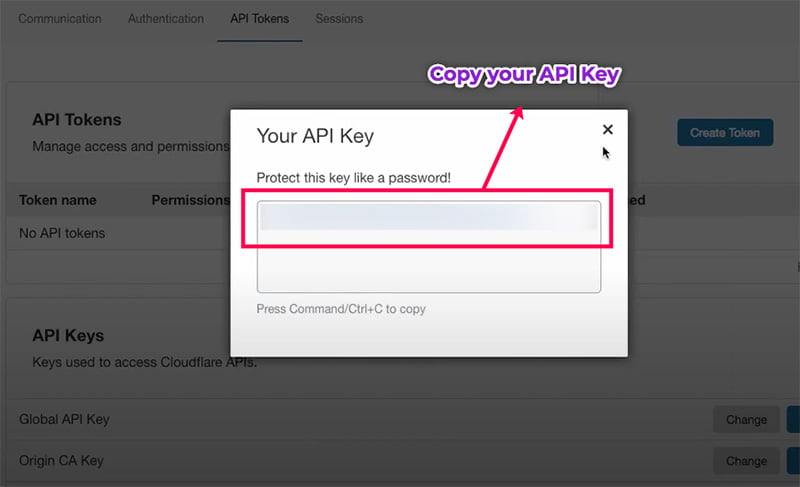
Please keep this API key confidential and do not share it with anyone.
4. Connect the Cloudflare plugin with the Cloudflare account.
In the Cloudflare plugin sign in screen, enter the email address you used for the Cloudflare account and API key you just copied in the previous step.
Then click on the Save API Credentials button.
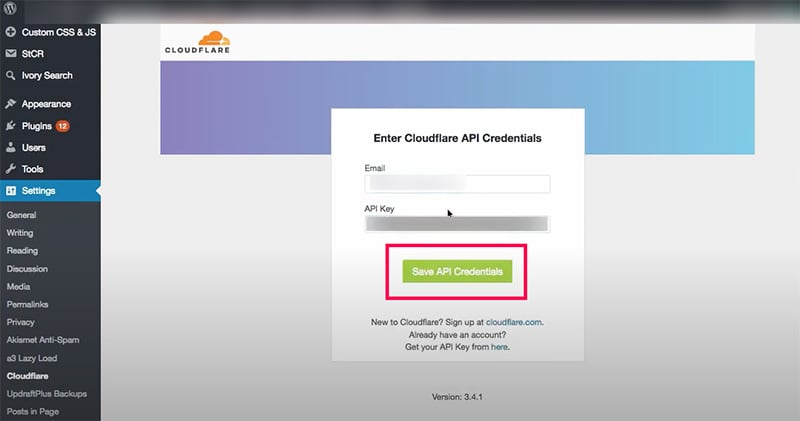
Once it’s connected successfully, you can see various options to change Cloudflare settings.
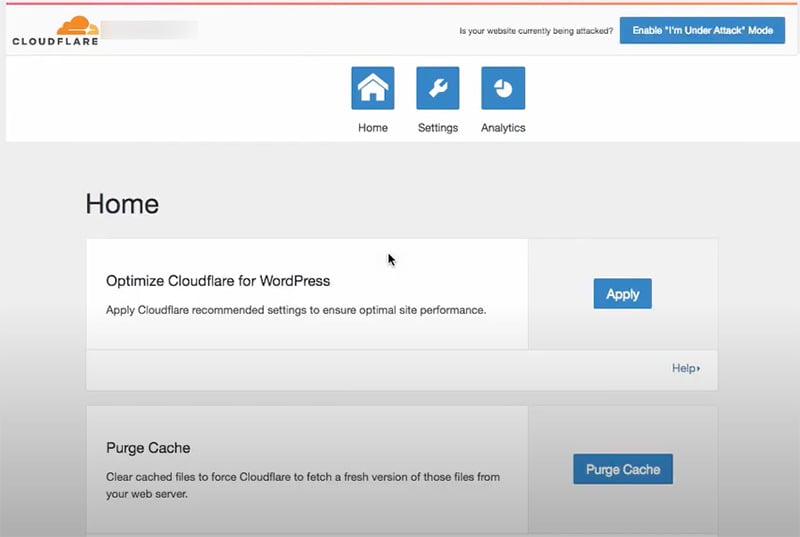
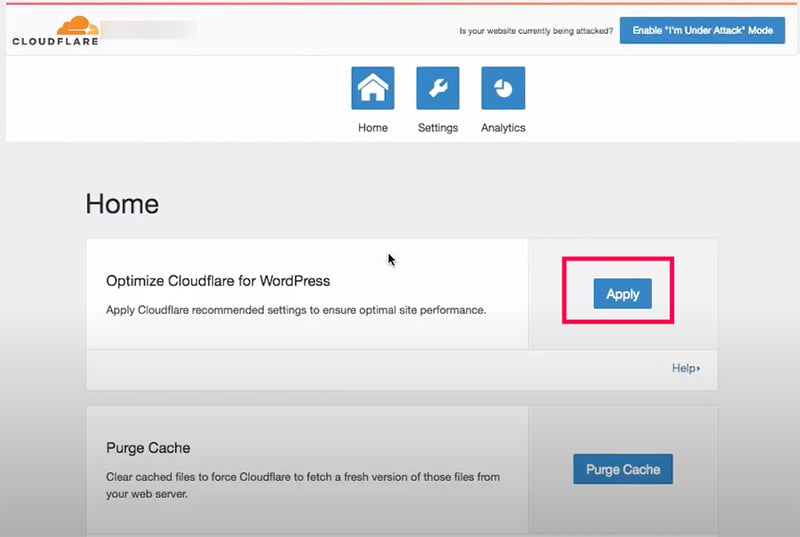
5. Optimize Cloudflare for WordPress
You can click on the Apply button to optimize Cloudflare for WordPress.
Purge Cache – Refreshing the cache in Cloudflare CDN
In the Cloudflare plugin page on the WordPress dashboard, you can see a Purge Cache button.
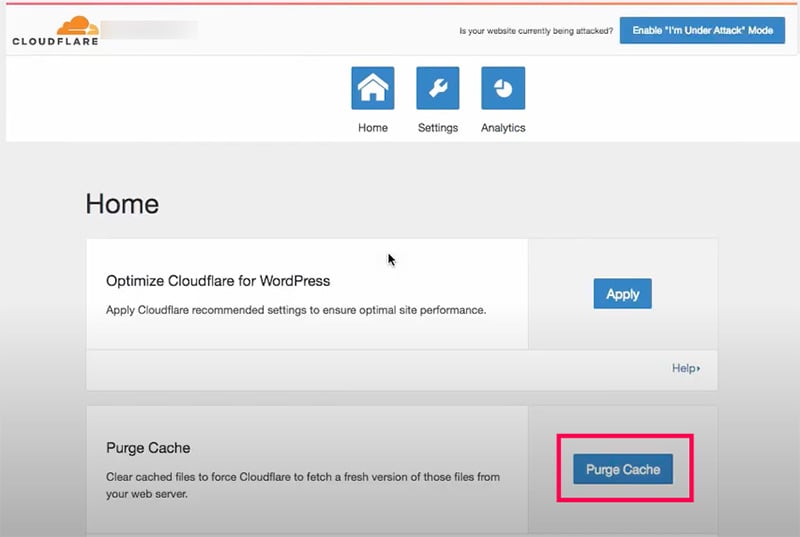
You may want to click that button each time you make changes to your website. Here is what it does.
Cloudflare CDN duplicates various files from your website and delivers it to the visitors from its servers. This could cause issues when you make changes to the website.
For example, once you change a CSS file on your website, the changes will not be reflected in the duplicate copy of the CSS file in Cloudflare CDN.
As a result, the visitors may not be able to see the changes you made recently because the visitor gets the CSS file from Cloudflare CDN which doesn’t include the recent change you made.
To fix this issue, Cloudflare CDN has to fetch your files from your website again and save the latest version of the file as a cache.
Most CDNs refresh their cache periodically.
But if you want to make the changes to take effect immediately, you can click on the Purge Cache and then choose Purge Everything or Purge Individual Files.
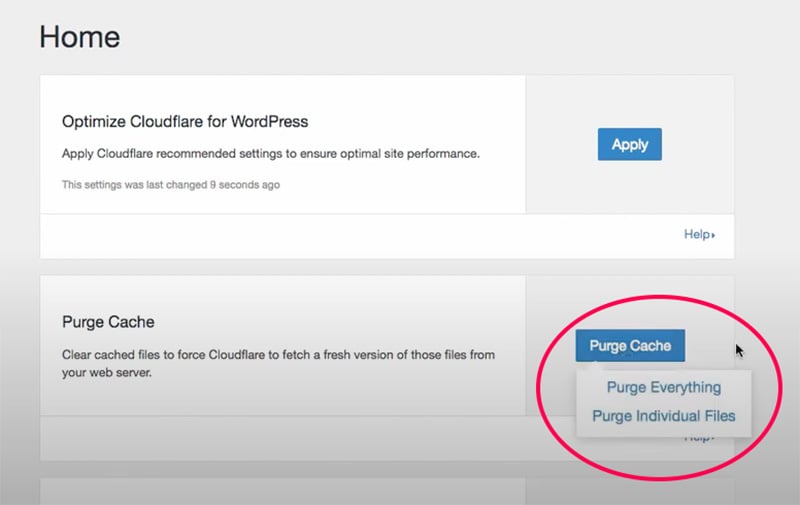
If you have an ecommerce website with lots of images, it’s better to avoid using the Purge Everything option because it will consume lots of bandwidth and take much time.
So, if you only made changes to one or two files on the Website, it’s better to choose Purge Individual Files and then choose files you want to refresh.
You can also enable Automatic Cache Management to automatically refresh and update Cloudflare CDN cache.

Further Performance and Security Improvements with Cloudflare
Apart from offering CDN service, Cloudflare also adds various security layers to a website and performance improvement features even in the free plan.
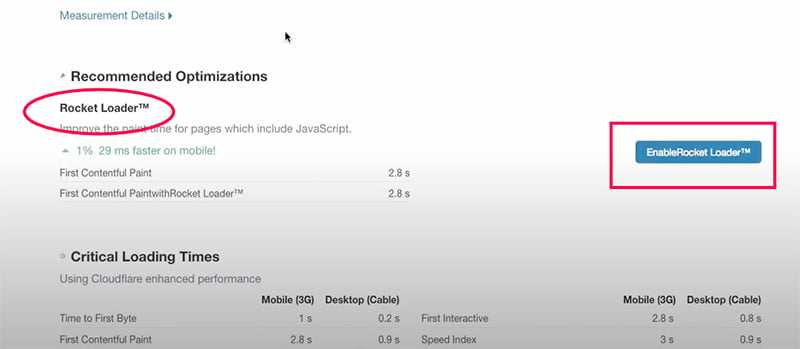
Enable Rocket Loader
Rocket Loader improves the paint time for web pages that include Javascript. To enable it, go to the Speed page in the Cloudflare dashboard and click on the Enable Rocket Loader button.
HTML, CSS, and Javascript minification
If you haven’t already minified your HTML, CSS, and Javascript files, you can do it from the Cloudflare dashboard as well.
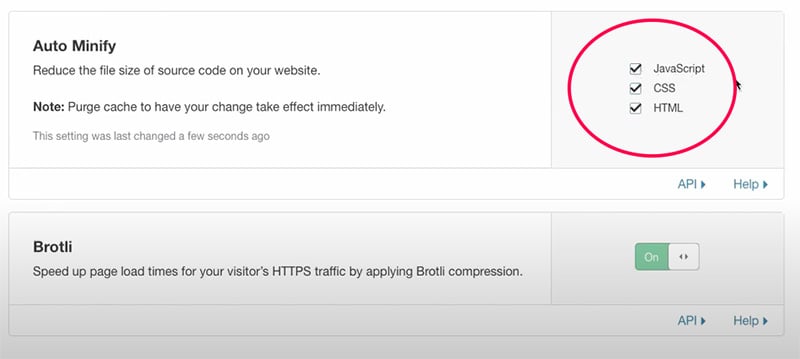
Go to the Optimization tab under the Speed page.
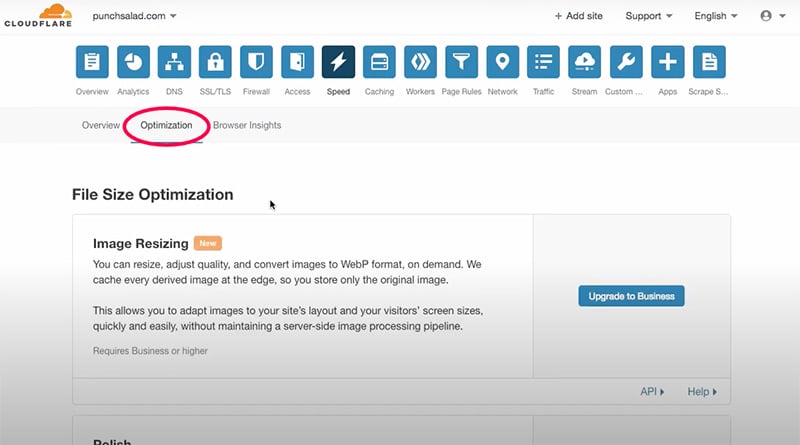
Scroll down to the Auto Minify section, and check the checkboxes for HTML, CSS, and Javascript.
Summary
We hope that this blog helped you to understand the idea of CDN and took the scare out of implementing CDN on your website. It may appear to be a quite advanced task as you need to play with the domain name settings. But the truth is it can be done by anyone if they follow a proper guideline like this blog.
If you have any trouble with following the instruction or cause any error please feel free to post a comment below.
If you want to improve the performance and page loading speed of your website, you may like our complete guide website performance optimization.
Want to experience what trusted eCommerce support feels like? Sign Up For A Trial
 Shares
