

How To Do WooCommerce Maintenance [DIY Guide]
How To Do WooCommerce Maintenance [DIY Guide]
Just like physical stores, online stores also require regular housekeeping to keep everything running smoothly.
If you have recently started an eCommerce store you might be tempted to consider WooCommerce and WordPress maintenance as cumbersome and unnecessary because you might not see any immediate benefits.
But regular maintenance of an eCommerce website is an absolute necessity to ensure the uncompromised performance, security, and smooth functioning of the online store. The worst case scenario for an online store owner is a security hack, exposing the details of your customers and putting you at risk of a regularity fine. A close second is broken functionality, leading to lost orders, frustrated customers and lost trust.
Keeping up to date with WooCommerce and WordPress maintenance reduces the possibility of this happening by regularly updating security patches and ensuring that plugin functionality is working correctly to avoid front end performance issues.
You could hire a pro or an agency that offer WooCommerce support plans or WooCommerce Maintenance Packages (like we do here at StorePro.io) to do the WooCommerce maintenance work for you. But if you are the kind of person who likes to take the DIY route or you want to know best practices for WooCommerce Maintenance then his blog will help you to do the WooCommerce maintenance by yourself – safely.
What is WooCommerce Maintenance?
By WooCommerce maintenance, we mean the regular updating of WordPress Core, WooCommerce, themes and plugins. The definition may also mean the updating of WooCommerce template files. You need to update the template files if your theme is outdated or you’re using a custom theme. WooCommerce maintenance also includes the checking of your site for conflicts and broken functions after you have completed the updates. WooCommerce maintenance is usually not a difficult process. You can manage WooCommerce maintenance easily if you follow a set process to detect and fix conflicts. It is however time-consuming and tedious. If you do encounter a plugin conflict it can require technical skills to resolve
How To Safely Do WooCommerce Maintenance
You will find below a simplified version of the process that we complete on many sites on a daily basis. This may appear like a long process. Each step serves a specific purpose, based on experience, and keeps the store safe and stable.
• Create a backup of your site
The first and most important step you can take in any WooCommerce maintenance process is to take a BACKUP! You should not make any change on your website without first taking a full backup on your files and database. Things go wrong, on some sites they often go wrong! Prepare ahead by taking a backup.
Even Better – Create Regular Off-server backups
Your hosting service provider may be offering the regular automatic backup service. But you shouldn’t rely on it completely. This applies unless they allow you to export the backups to cloud storage outside the server. Hackers or server crashes can wipe out your backup if you store it only on the server. This happens if you have the backup copy only on the server.
So, you need to save the backups outside your server.
Fortunately, most WooCommerce hosting service providers offer this feature. You can schedule automatic backups and export the backup file into cloud storage services like Dropbox and Google Drive.
There are also many free and paid WordPress backup plugins out there offering the same service. You can use any one of them to schedule the automatic backup of your website. Do this if your hosting service provider doesn’t have the feature
• Ensure that the backup works
After backing up your website, test the backup to confirm it restores properly. Once you start making changes on your website, you need to be confident. You should know you can easily restore a copy of your website to get it back to normal. This removes a large amount of stress from the possibility of problems arising. So, it’s always a good idea to check if you can successfully restore a backup. Do this before you start making changes on the website
• Set up a staging site
A staging site is a clone of your real website. Instead of making changes directly on the main website, you create a copy of your website. Then start making changes on the staging site. This allows you to test changes and updates on your website without touching the actual production website.
Once you are sure that the changes you made work as expected and there are no issues, then replicate these changes on your live website.
Using a staging site, you can also test new features and experiment with fixing bugs without affecting the live website.
The idea of creating a staging site may seem complicated. But hosting service providers usually make it pretty easy. You can check the documentation of your hosting service provider. This will help you find out how to create a staging site on your particular website. Some professional WooCommerce support companies such as StorePro.io will provide you with an additional staging site. This site is not connected to your web host.
One word of warning: the “push to live” service provided by many hosting companies can overwrite your database. You risk overwriting your live site database if you use the “push to live” feature. Therefore we would recommend that you do not use this service if you are running WooCommerce. Otherwise, you may end up losing orders. Instead, simply re-do your updates directly on the live site. Do this safe in the knowledge that you have already tested them on your staging site. Doing this helps you protect your live database from incorrect changes.
• Switch Off All Caching On Staging
Before you begin any updates it is best practice to switch off all forms of caching on your staging site. This includes CDN networks and any modification plugins or settings. Ideally, just deactivate your caching plugins or turn off at server level if your hosting handles caching. This will ensure that when checking your site after you complete an update, you are seeing the latest version of the site. It ensures that you are not seeing a cached version. It is also a good idea to check your site on an Incognito or Private tab. This ensures your browser is not showing you a cached version and hiding a site issue.
• Update WordPress Core
Once you have the staging website ready, check for pending WordPress updates, theme updates, and plugin updates.
WordPress or your host usually applies minor updates automatically, including security fixes and translation patches. WordPress or your hosting provider may apply these updates automatically. This is good because you don’t have to update it manually every time when there is a new security patch. Moreover, it also helps you to keep your website more secure. Your first step is to check for WordPress Core Updates.
You can also enable automatic updates for the major releases of WordPress core but we don’t recommend it.
If a recent major WordPress core update is available such as 5.6 or 6.0, etc., then we recommend that you do NOT update to a recent major WordPress core update. A major WordPress version is dictated by the first two sequences, while a third sequence is a minor one like, eg, 5.6.1. It is inevitable that major releases carry inherent bugs. Therefore, we suggest that you wait two or three weeks. Wait for developers to fix issues and release a patched minor version. This might look like 6.0.1.
• Update WooCommerce Core
Next on your list should be WooCommerce. Updating WooCommerce plugins to the latest version before updating the core WooCommerce plugin can sometimes cause issues. So we suggest that you update the WooCommerce core plugin first (after WordPress). WooCommerce is a plugin, so this will be the first plugin that you will update.
The same caution regarding Major updates applies to WooCommerce as it does to WordPress. If you see a fresh Major update, then hold off. Don’t update immediately. Developers often fix unforeseen bugs in the first couple of weeks after a major release. So, wait until the first minor release after the major one. For instance, 4.5.0 is a major release. But we would suggest that you wait until 4.5.1 becomes available before you update to this major release. This means that at the same time as updating to the major release, you are also getting fixes. These fixes address the bugs users report right after a new version comes out.
• Update Your Theme
So now you have updated WordPress and WooCommerce, whats next?
Update Your Theme – But only if you use a Child Theme!
Most WordPress / WooCommerce websites contain some form of modification. In fact, this is the beauty of WordPress and WooCommerce. Something that you don’t get with Shopify or most other platforms. WordPress and WooCommerce sites are as customizable as your imagination. Most sites have taken advantage of this to some degree.
If you’ve modified your theme (e.g., CSS changes), use a child theme instead. The purpose of a child theme is to ensure that you can update the parent theme without losing your theme modifications. If you are running a child theme, then go ahead and update your parent theme. Do this if updates are available for your theme. If you do not have a child theme, then we would recommend that you consult with a developer. Do this before updating your theme. They will need to check the location of your modifications. This setup protects your customizations when you update the parent theme.
• Update Your Plugins
Now it is finally time to update your plugins. But as usual, there is one caveat! You only want to update plugins that are 100% compatible with the WordPress and WooCommerce version you are now running. Thankfully this is easy to check. There are two ways to check for compatibility.
Firstly you can go to the WordPress Dashboard -> Updates. This will show you a list of plugins that have available updates. It will also show whether they are 100% compatible with your current WordPress and WooCommerce version. You can update the plugins from this screen by selecting the plugins you wish to update.

The second method is to navigate to the Dashboard -> PLugins -> Installed Plugins. Here you will see a list of all your installed plugins, including those that have available updates.
Each plugin which has an update available should also have a link to view the details on the update. Clicking this opens a popup that shows which version the plugin supports.
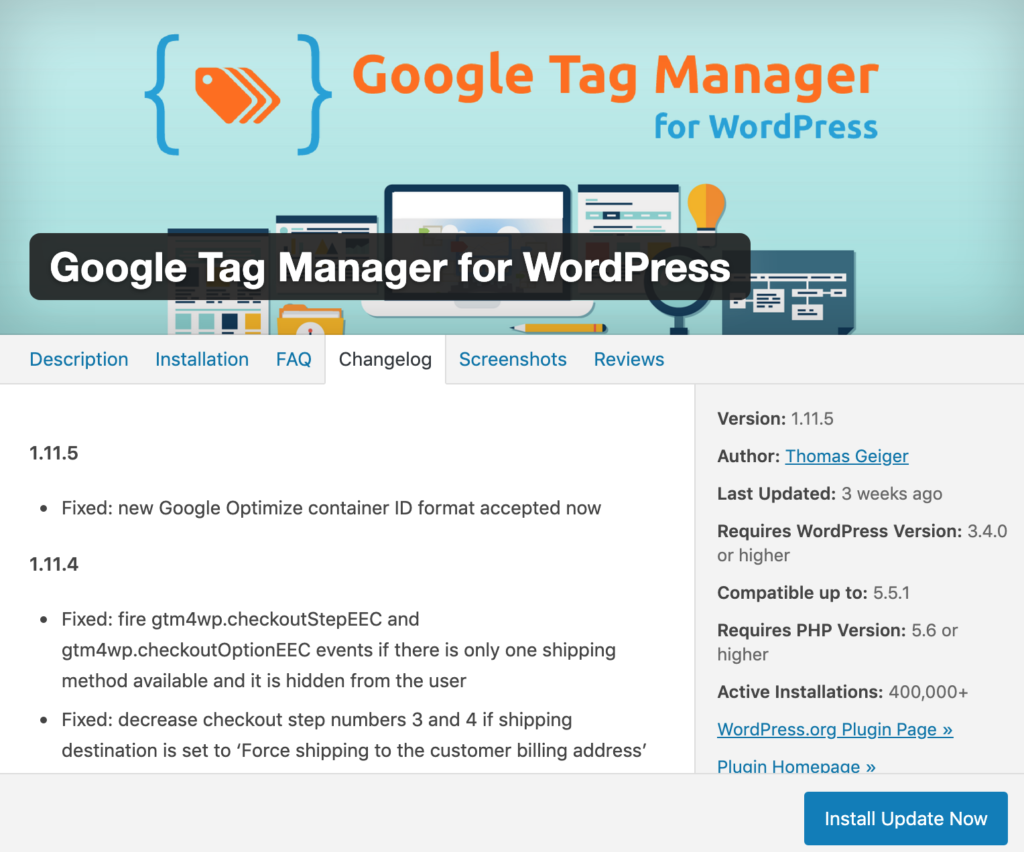
A plugin may still work fine even if it doesn’t show full compatibility with your current version. It simply means that the plugin author has not yet tested the plugin with the latest WordPress or WooCommerce version.
If you want to update a plugin which does not show 100% compatibility, then update the compatible plugins first. Then test and come back to update the remaining plugin. This will make it easier to see if the untested plugin is causing an issue.
• Test The Staging Site
At this point, you will have updated your WordPress and WooCommerce core, themes and plugins. Now it’s time to test.
Here is how we suggest you test your staging site.
- Purge Your Cache if you have not already turned it off (see step 4)
- Open the staging site on an Incognito or Private Tabs and load site in both desktop mode and mobile mode.
- Visually Inspect homepage, category page, single product page, Cart page. Compare to Live site for both desktop and mobile
- Check the following Functions. Add to Cart, Product Variations (if variable products), Search & paginated results, Checkout
- (Place Test Order), Contact Forms.
- Add or Remove Plugins If Desired (on staging)
After updating and testing your staging site, it should now work properly. It is time to add new plugins or remove in-active ones if you want to make changes to your site.
Why wait until this stage?
All of the steps we have taken are about making it easy to identify the cause of errors. This is helpful should you happen to encounter any. So if your site works perfectly after the update, but when you add a plugin to staging you spot an error, you can identify the new plugin. You will at least know that the new plugin is conflicting with an existing one. However, if you updated and added or removed plugins in one step, then it makes it difficult to identify the source of any errors. You’ll need more time to test and backtrace.
It is good practice to uninstall unwanted plugins from the dashboard, rather than simply deactivate them and leave them installed.
Now Re-test your staging site.
• Initiate WooCommerce Maintenance Mode On Your Live Site
Once you have tested the changes on the staging site, your next step is moving these changes to the live site.
It is best practice to close your site to customer orders during updates.
There are a number of reasons for this.
- It makes it easy to take a “Before Update” backup and restore this backup should anything go wrong. If you don’t close the site to new orders and you encounter a problem which requires restoring a backup taken before the update, then you may lose orders received in the interim.
- Secondly, it prevents the customers from receiving errors. These may occur when the site is in the midst of completing an update.
It’s also a good practice to let the website visitors know. Tell them that your store will be on maintenance during a particular period. You can show a site-wide alert message. For example: “Your online store will be on maintenance from 1:00 AM to 2:00 AM on 5th July 2020.” This builds trust with customers and makes you look more professional. You can find plenty of plugins to create and display site-wide warning notices.
There are many WooCommerce-related plugins to enable maintenance mode. These can show an “under construction” or “coming soon” page to the visitors. Be careful though and ensure the messaging is accurate. Many plugins may display “Coming Soon” text when you actually want to state that the site is undergoing planned maintenance.
• Create a new “Before Update” backup
Since the site is closed for live orders, take a fresh “Before Update” backup. This will be your fallback should anything unexpected happen during the live site update. Store it off-site (i.e, not on your hosting server). Also, make sure you have tested the ability to restore your site.
• Update The Live (Production) Site
If your staging site works fine, go ahead and apply the same changes to your live site. Do it in the same order as completed on staging. Remember to turn off caching before you update and test.
• Test The Live (Production) Site
Follow the same process for testing as you did on staging. This includes placing a live test order to ensure that the payment processing is working. You’ll notice some elements, like payment gateways, differ between staging and live sites. On staging, you are normally using sandbox details, whereas on live you will be using live payment details. So it is important that you go through the full process. This is the process a customer needs to go through in order to purchase from you. Don’t assume that sandbox details worked so production details will work also.
• Create a new “After Update” backup
You are almost there! After completing the update, take a new “After Update” backup. You can use this backup in conjunction with the “before” backup. This is helpful if you need to troubleshoot an issue in the future. These are great reference points to major changes on the site.
Other WooCommerce Maintenance Tasks
• Activate Security scanning
Setting up an automated security scanning system on your website may seem unnecessary now. You’ll regret skipping security if your site gets hacked or infected with malware.
There are many great WordPress security plugins out there. You can try any one of them to automate the security scanning on your website.
Premium WordPress security plugins can completely automate the security. Free plugins usually only do the security scanning and report the issues.
• Switch on Automatic Uptime Monitoring
Server downtime has a significant impact on your sale and business. So, you need an automated system that regularly monitors if your site is live. It also tells you when your site is down.
Even the free uptime monitoring services check the websites in every five minutes or so.
Please remember that the monitoring service won’t do anything to fix the issues. Its only job is to check and map your website’s uptime. You should take appropriate actions if your site goes down every now and then.
Setup Regular Checking Of Your website Performance(Speed)
The speed of your website is crucial not only for your customer experience but also your Google SEO ranking. Performance may reduce due to various reasons even if you have optimised it before. So, it is a good practice to check the loading speed of your website regularly.
How Can StorePro Help With WooCommerce Maintenance?
If you don’t have the time to follow the above process, then it is best to employ a Professional WooCommerce Maintenance Company like us to do it for you. We do WooComemrce Maintenance safely and professionally. Not only that but we do it overnight so as not to impact your customers.
Plus StorePro is unique because we have developed our own automated WooCommerce Testing Dashboard. You will have free access to a dashboard that automatically tests your website speed on a daily basis. It also compares it to a daily test of your chosen competitor. It tests common tasks such as Add to cart and checkout, as well as checking your website uptime.
Summary
WooCommerce maintenance can be tedious in nature. But you can undertake it safely if you follow a set process on a regular basis. Following a process ensures that if anything goes wrong or if you encounter an error, then you are in a good place to recover. But regular WooCommerce maintenance is the best way to stop major issues from happening on your site. Regular maintenance also protects your site from hacks caused by unpatched vulnerabilities.
What is your experience of WooCommerce Maintenance? Do you like the DIY route or do you hire a company to do the work on your behalf?
Want to experience what trusted eCommerce support feels like? Sign Up For A Trial
 Shares

